Using devstack to create 2 tenants with floating ips.
The Scenario
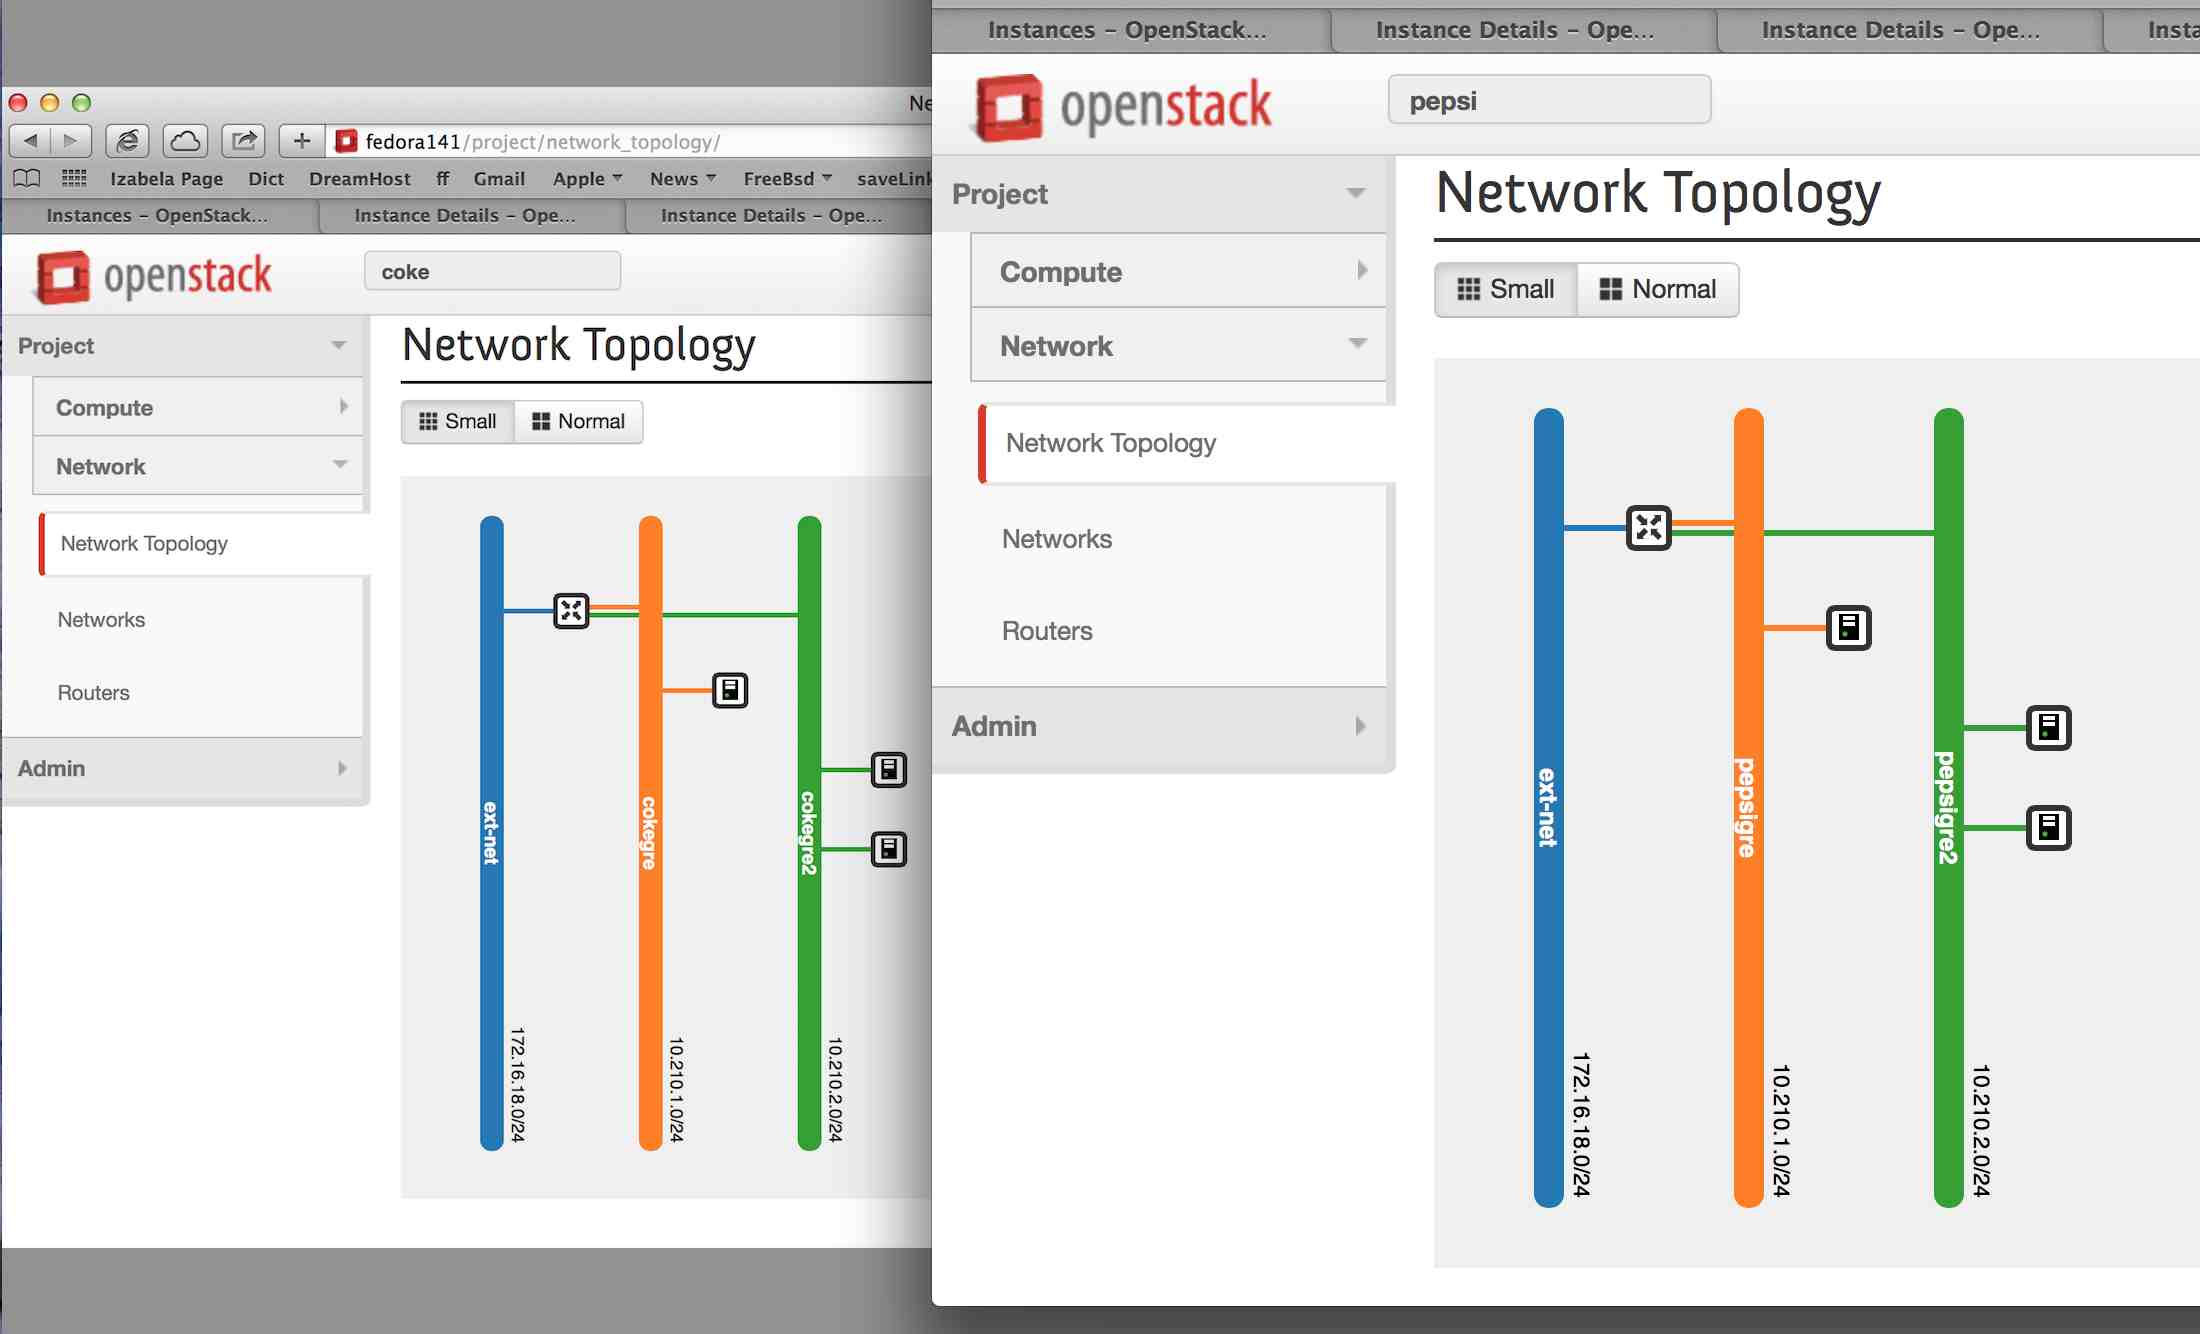
In order to better understand how l3 forwarding works in openstack, I augumented Madhu's tenant example, so I could exercise a few points:
- How tenants' are isolated (using their own vrouter and namespaces)
- How tenants can have multiple subnets (with multiple networks) and use their vrouter to forward traffic between them
- How to run the l3-agent in a separate node
- How to add floating ip addresses from a common pool to different tenant's vms
- How isolated tenant instances can reach each other by using their floating ips (going through the external network)
Configs
Starting Opendaylight controller
Running stack.sh on nodes
Make Tenants
Inspecting
For this exercise, I use the 4 vm nodes I created earlier:
A) control + compute1 -- fedora141 (172.16.150.141)
B) compute2 -- fedora142 (172.16.150.142)
C) compute3 -- fedora143 (172.16.150.143)
D) network -- fedora144 (172.16.150.144)
I also use the host system (laptop) to run the opendaylight controller (172.16.150.1).
Each node itself is a vm running a fedora 20. Please refer to this link for steps I used to create them and have them configured. Since these vms -- in particular, the compute nodes -- will be spawning tenant vms, this is a bit like Inception: Using a "dream within a dream" strategy. :)
Configs
The file local.conf -- used by stack.sh -- for each of the nodes is shown below. If you are using addresses other than the ones in this example, make sure to update them in each of these files.
Also, for the very first time that you run stack.sh you will need to change the following 2 lines, so devstack install whatever it depends on:
OFFLINE=False
RECLONE=yes
To lockdown devstack, make sure to change it back after the successful stack.sh calls:
cd /opt/devstack
sed -i -e 's/^OFFLINE=False$/OFFLINE=True/' ./local.conf && sed -i -e 's/^RECLONE=yes/RECLONE=no/' ./local.conf
In my dry run, I ran into the following issue while calling stack.sh (in the control node) for the very first time:
2014-06-15 23:03:06.122 | + local charset=utf8
2014-06-15 23:03:06.124 | + recreate_database_mysql keystone utf8
2014-06-15 23:03:06.126 | + local db=keystone
2014-06-15 23:03:06.127 | + local charset=utf8
2014-06-15 23:03:06.129 | + mysql -uroot -pmysql -h172.16.150.141 -e 'DROP DATABASE IF EXISTS keystone;'
2014-06-15 23:03:06.131 | ERROR 1045 (28000): Access denied for user 'root'@'fedora141' (using password: YES)
2014-06-15 23:03:06.132 | + exit_trap
2014-06-15 23:03:06.134 | + local r=1
2014-06-15 23:03:06.136 | ++ jobs -p
2014-06-15 23:03:06.138 | + jobs=
2014-06-15 23:03:06.140 | + [[ -n '' ]]
2014-06-15 23:03:06.142 | + kill_spinner
2014-06-15 23:03:06.143 | + '[' '!' -z '' ']'
2014-06-15 23:03:06.145 | + exit 1
To resolve this issue -- which is only on the control node -- this is what I did:
[odl@fedora141 devstack]$ ./unstack.sh
...
[odl@fedora141 devstack]$ mysql --user=root --password="" mysql
...
MariaDB [mysql]> UPDATE mysql.user SET Password = PASSWORD('mysql') WHERE User = 'root';
Query OK, 3 rows affected (0.00 sec)
Rows matched: 5  Changed: 3  Warnings: 0

MariaDB [mysql]> FLUSH PRIVILEGES;
Query OK, 0 rows affected (0.00 sec)
MariaDB [mysql]> exit;
...
[odl@fedora141 devstack]$ ./stack.sh
A) control + compute1 node
# Handy first time commands
cd /opt/devstack
wget -O local.conf https://gist.githubusercontent.com/anonymous/46fbdd6449f2111d1319/raw/gistify60226.txt
sed -i -e 's/^OFFLINE=True$/OFFLINE=False/' ./local.conf && sed -i -e 's/^RECLONE=no/RECLONE=yes/' ./local.conf
# ./stack.sh
[odl@fedora141 devstack]$ cd /opt/devstack && cat local.conf
B) compute2 node
# Handy first time commands
cd /opt/devstack
wget -O local.conf https://gist.githubusercontent.com/anonymous/bafd436d7a124e9b1671/raw/gistify240325.txt
sed -i -e 's/^OFFLINE=True$/OFFLINE=False/' ./local.conf && sed -i -e 's/^RECLONE=no/RECLONE=yes/' ./local.conf
# ./stack.sh
[odl@fedora142 devstack]$ cd /opt/devstack && cat local.conf
C) compute3 node
# Handy first time commands
cd /opt/devstack
wget -O local.conf https://gist.githubusercontent.com/anonymous/eb6863e08fe2d823e861/raw/gistify311930.txt
sed -i -e 's/^OFFLINE=True$/OFFLINE=False/' ./local.conf && sed -i -e 's/^RECLONE=no/RECLONE=yes/' ./local.conf
# ./stack.sh
[odl@fedora143 devstack]$ cd /opt/devstack && cat local.conf
D) network node
# Handy first time commands
cd /opt/devstack
wget -O local.conf https://gist.githubusercontent.com/anonymous/02fec47445ce37fb3961/raw/gistify193848.txt
sed -i -e 's/^OFFLINE=True$/OFFLINE=False/' ./local.conf && sed -i -e 's/^RECLONE=no/RECLONE=yes/' ./local.conf
# ./stack.sh
[odl@fedora144 devstack]$ cd /opt/devstack && cat local.conf
Starting Opendaylight controller
At this point, I'm assuming that the 4 nodes are up and running, up to the point where you can call 'stack.sh' from the directory where local.conf is located (cd /opt/devstack)
Once local.conf is set as shown above, it is time to start OpendayLight, our favorite SDN controller! You do have a choice of running ODL inside the control node, but I normally run it outside the context of the VMs. In my case, the nodes will reach ODL via their eth2 interface, to get to my laptop: 172.16.150.1. And that is why local.conf has that address in the ml2_odl section. If you rather run ODL inside control node, enable the odl-server service in local.conf.
Install pre-requisites
$ sudo yum install -y java-1.7.0-openjdk

Download The OpenDaylight Virtualization Distribution
$ wget http://nexus.opendaylight.org/content/repositories/opendaylight.release/org/opendaylight/integration/distributions-virtualization/0.1.0/distributions-virtualization-0.1.0-osgipackage.zip
$ unzip distributions-virtualization-0.1.0-osgipackage.zip

Run the Controller
$ cd opendaylight

Using OpenFlow v1.0
$ ./run.sh -XX:MaxPermSize=384m -virt ovsdb
-- OR --
Using OpenFlow v1.3
$ echo "of.listenport=6653" >> configuration/config.ini
$ echo "ovsdb.of.version=1.3" >>  configuration/config.ini
$ ./run.sh -XX:MaxPermSize=384m -virt ovsdb -of13
Running stack.sh on nodes
At this point, invoke cd /opt/devstack && ./stack.sh from the nodes. I normally do that in this order: 1)control+compute1; 2)network; 3)compute2; 4)compute3. If this is the first time you are doing this, remember the notes above.
If you hit failures in stack.sh due to things not being 'clean', try invoking ./unstack.sh . If that does not work, you can also use /opt/osreset.sh which will take extra steps to clean up the state of the node.
Make Tenants
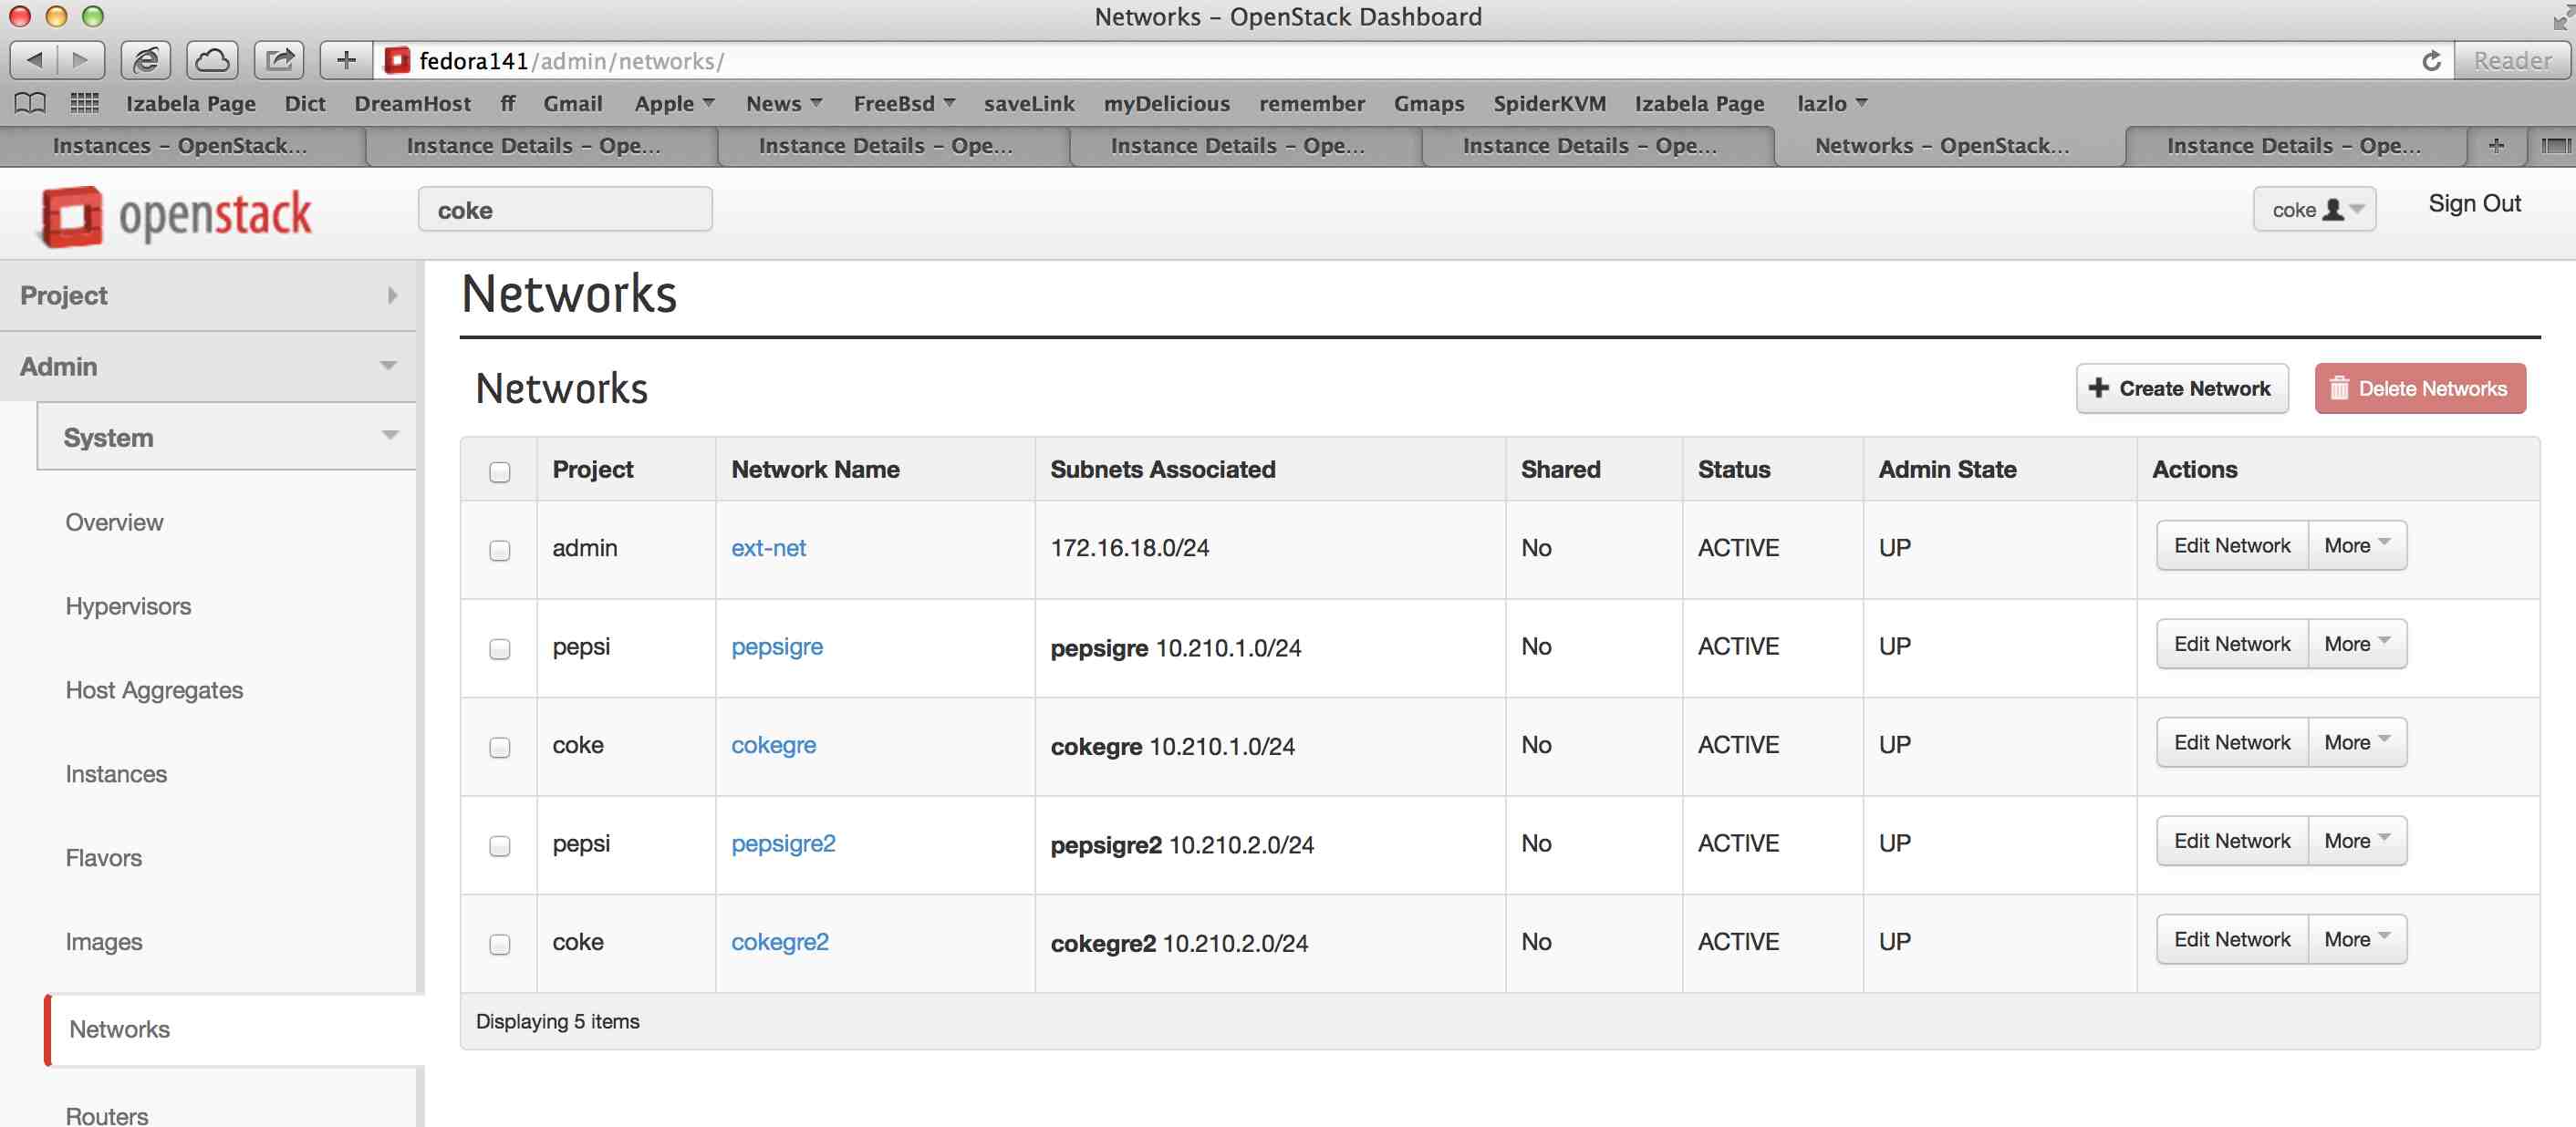
It is time to put openstack to work. What we do here is to create 2 tenants: coke and pepsi. For each tenant, we create 2 subnets and a router. We also create an external network, which connects both tenant's routers. Lastly, we assign floating ip addresses to each instance, which allows them to reach each other by going through the external network. The overlay network is using gre tunnels, and that --together with ip namespaces-- allows the tenants to use the same subnets while being completely isolated from each other.
https://gist.github.com/2099991f4194f6056d27

cd /opt/devstack

source openrc admin admin

# create ssh key for each tenant
#
for x in coke pepsi ; do echo "ssh key for ${x}" ; \
   rm -f id_rsa_${x}* ; ssh-keygen -t rsa -b 2048 -N '' -f id_rsa_${x} ; done

# create external network
#
neutron net-create ext-net -- --router:external=True
neutron subnet-create ext-net --allocation-pool start=172.16.18.200,end=172.16.18.210 --gateway=172.16.18.2 --enable_dhcp=False 172.16.18.0/24

# Update policy to allow icmp and ssh
#
for uuid in $(neutron security-group-list | grep default | awk '{print $2}') ; do echo "uuid ${uuid}" ; \
    for direction in ingress egress ; do echo “direction ${direction}” ; \
        neutron security-group-rule-create --protocol icmp --direction ${direction} ${uuid} ; \
        neutron security-group-rule-create --protocol tcp --port-range-min 22 --port-range-max 22 --direction ${direction} ${uuid} ; \
done ; done

# Create 2 subnets for each tenant. Notice that the segmentation_id must be unique, but the subnets do not
#
for x in coke pepsi ; do echo "configuring ${x} tenant" ; \
    keystone tenant-create --name ${x}
    keystone user-create --name ${x} --tenant ${x} --pass ${x}
    keystone user-role-add --user ${x} --role admin --tenant ${x}

    [ ${x} == 'coke' ] && tunnelId1=593 || tunnelId1=768
    neutron net-create ${x}gre --tenant-id $(keystone tenant-list | grep '\s'${x}'' | awk '{print $2}') --provider:network_type gre --provider:segmentation_id ${tunnelId1}
    neutron subnet-create ${x}gre 10.210.1.0/24 --name ${x}gre --dns-nameserver 8.8.8.8

    [ ${x} == 'coke' ] && tunnelId2=594 || tunnelId2=769
    neutron net-create ${x}gre2 --tenant-id $(keystone tenant-list | grep '\s'${x}'' | awk '{print $2}') --provider:network_type gre --provider:segmentation_id ${tunnelId2}
    neutron subnet-create ${x}gre2 10.210.2.0/24 --name ${x}gre2 --dns-nameserver 8.8.8.8
done

# Add ssh key and a dedicated router instance to each tenant
#
for x in coke pepsi ; do echo "configuring ${x} tenant key and router" ; \
    source openrc ${x} ${x} ; export OS_PASSWORD=${x}

    nova keypair-add --pub-key  id_rsa_${x}.pub  ${x}_key
    # nova keypair-list

    neutron router-create ${x}router
    neutron router-gateway-set ${x}router ext-net
    neutron router-interface-add ${x}router ${x}gre
    neutron router-interface-add ${x}router ${x}gre2
    # neutron router-port-list ${x}router
done

# This loop will create 3 instances for each tenant. 1 out of the 3 will be in a separate subnet, which means it will
# still be able to reach the other 2 tenants but only through the tenants router
#
for x in coke pepsi ; do echo "creating ${x} tenant instances" ; \
    source openrc ${x} ${x} ; export OS_PASSWORD=${x}

    nova boot --poll --flavor m1.nano --image $(nova image-list | grep 'cirros-0.3.2-x86_64-uec\s' | awk '{print $2}') --nic net-id=$(neutron net-list | grep -w ${x}gre2 | awk '{print $2}') --key-name ${x}_key ${x}21
    nova boot --poll --flavor m1.nano --image $(nova image-list | grep 'cirros-0.3.2-x86_64-uec\s' | awk '{print $2}') --nic net-id=$(neutron net-list | grep -w ${x}gre2 | awk '{print $2}') --key-name ${x}_key ${x}22
    nova boot --poll --flavor m1.nano --image $(nova image-list | grep 'cirros-0.3.2-x86_64-uec\s' | awk '{print $2}') --nic net-id=$(neutron net-list | grep -w ${x}gre | awk '{print $2}') --key-name ${x}_key ${x}11
done

# This loop will take public ips from a common pool and assign them to coke and pepsi tenants. Using these, the tenants can
# reach the outside world and find each other.
#
for x in coke pepsi ; do echo "creating ${x} tenants floating ips" ; \
    source openrc ${x} ${x} ; export OS_PASSWORD=${x}

    for instanceName in ${x}21 ${x}22 ${x}11 ; do echo ${instanceName} ; \
       currIp=$(nova floating-ip-create ext-net | grep 'ext-net' | awk '{print $2}') ; \
       nova add-floating-ip ${instanceName} ${currIp} ; \
       echo "nova add-floating-ip ${instanceName} ${currIp}" ; \
done ; done
Inspecting
To check how things work, it helps looking at the bridges and tunnels that ODL created in order to connect nodes and its tenants.

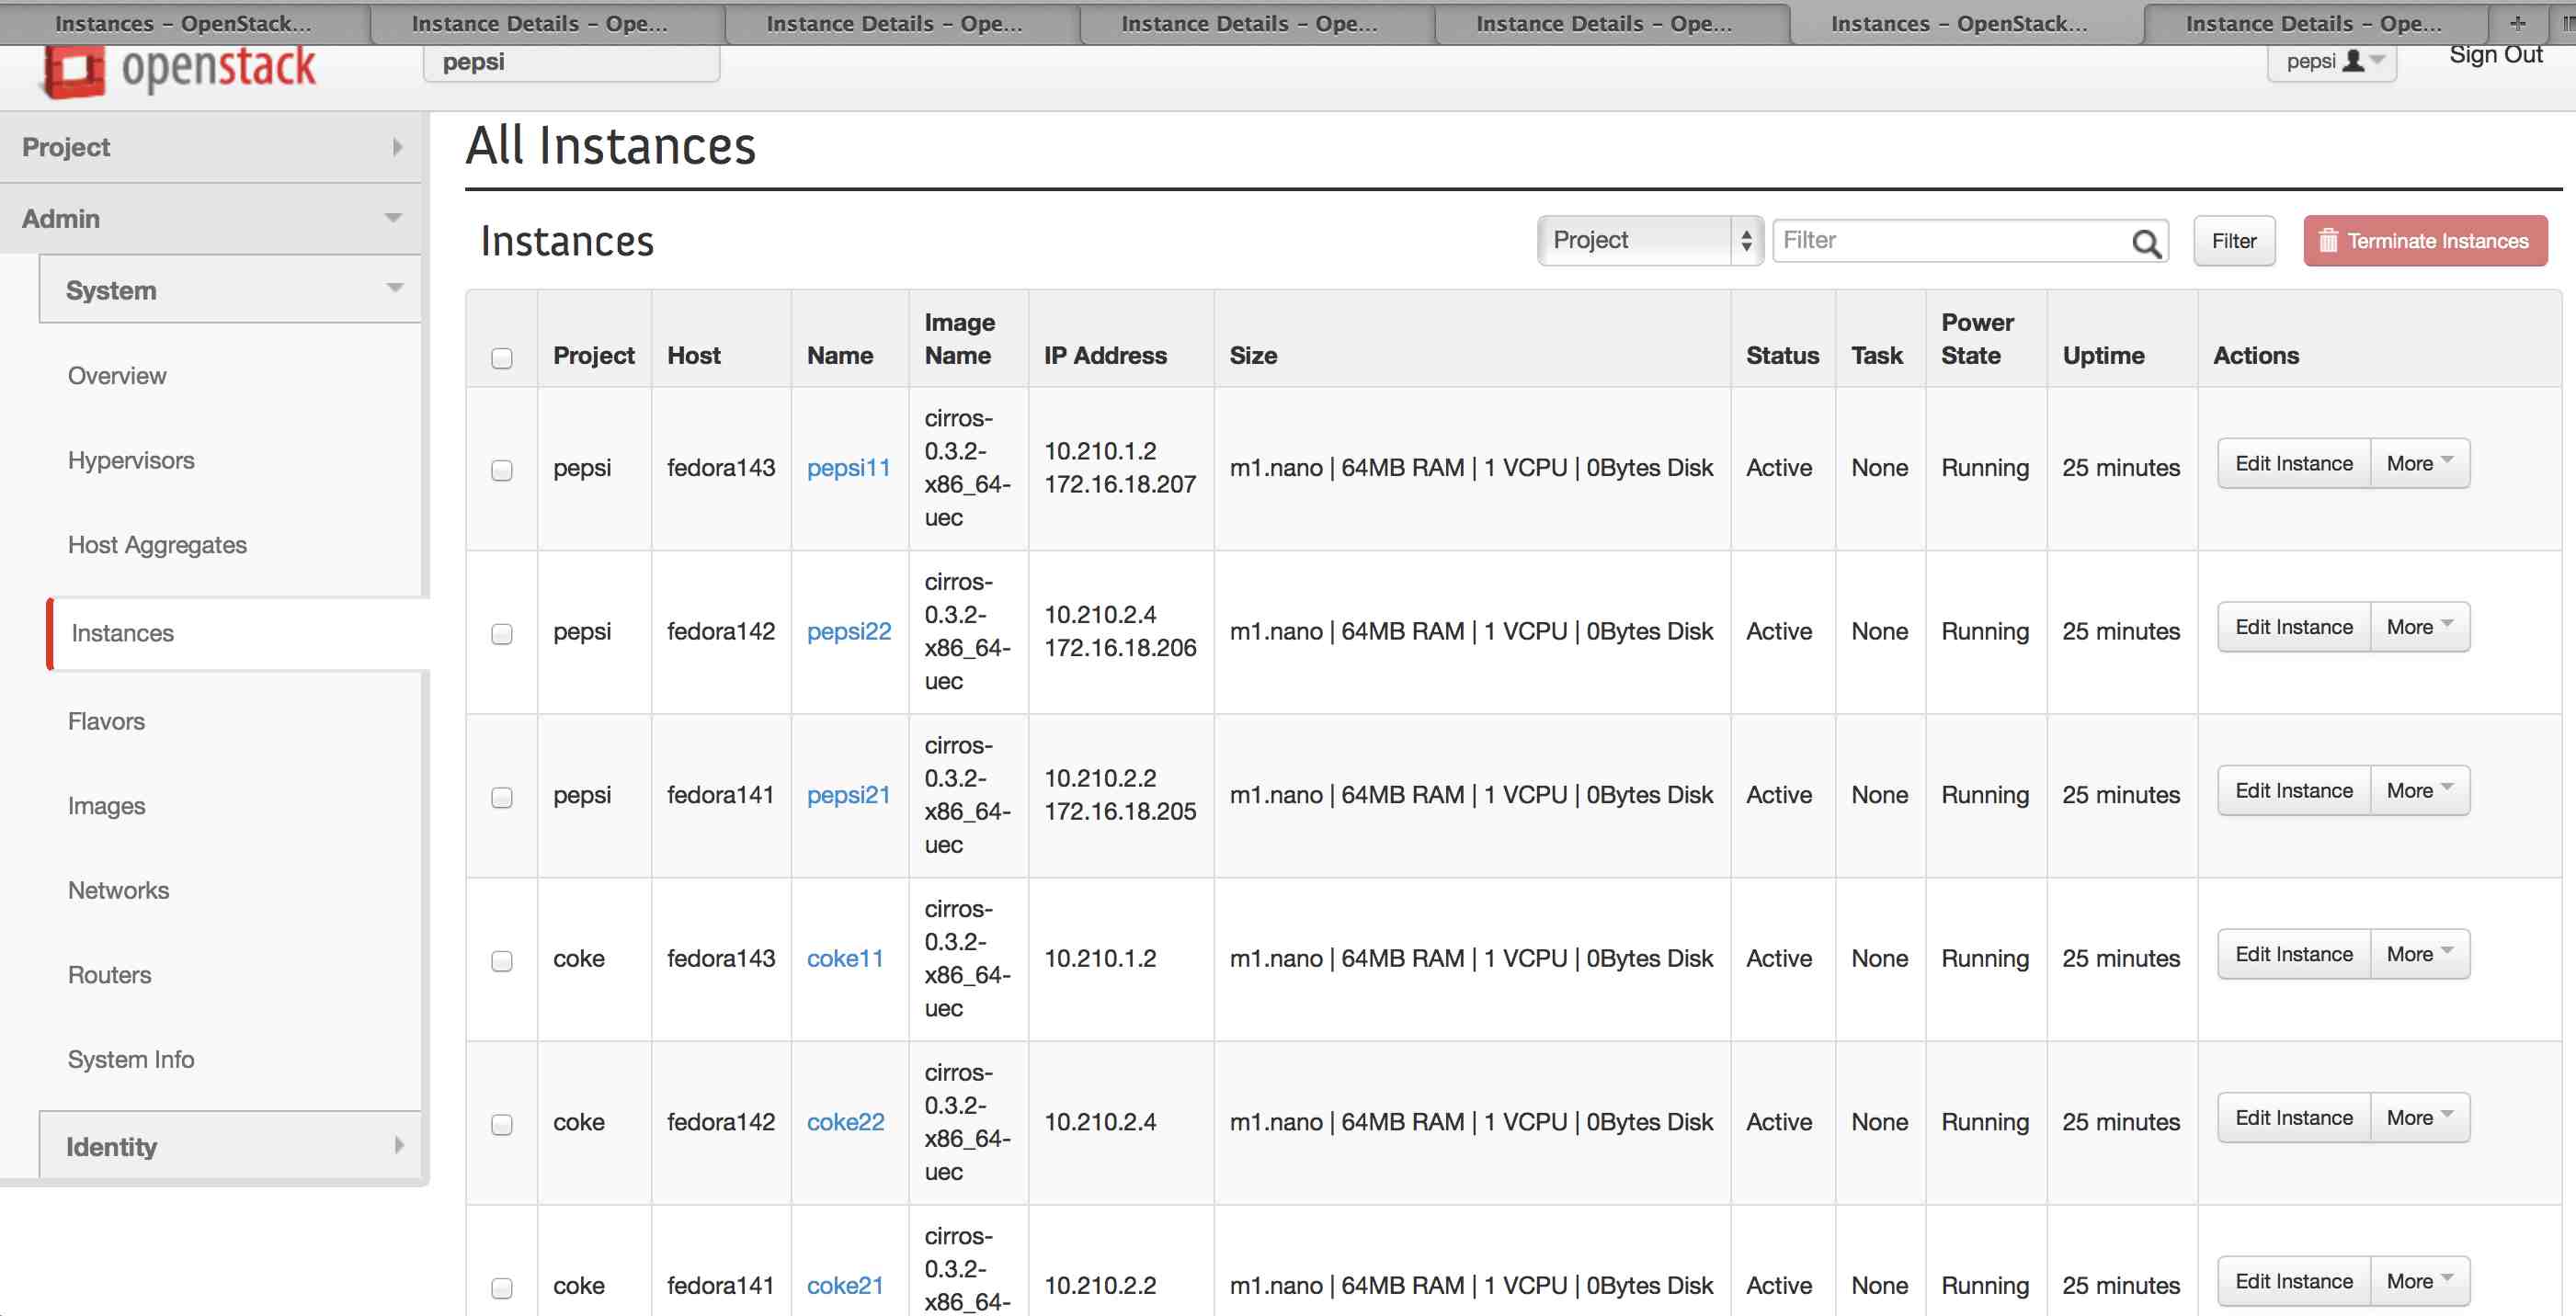
Notice which nodes ended up hosting the various instances. In the picture below, only pepsi tenants display their floating ip. That is so, because we were logged is as pepsi at the time.

A) control + compute1 -- fedora141 (172.16.150.141)
B) compute2 -- fedora142 (172.16.150.142)
C) compute3 -- fedora143 (172.16.150.143)
D) network -- fedora144 (172.16.150.144)
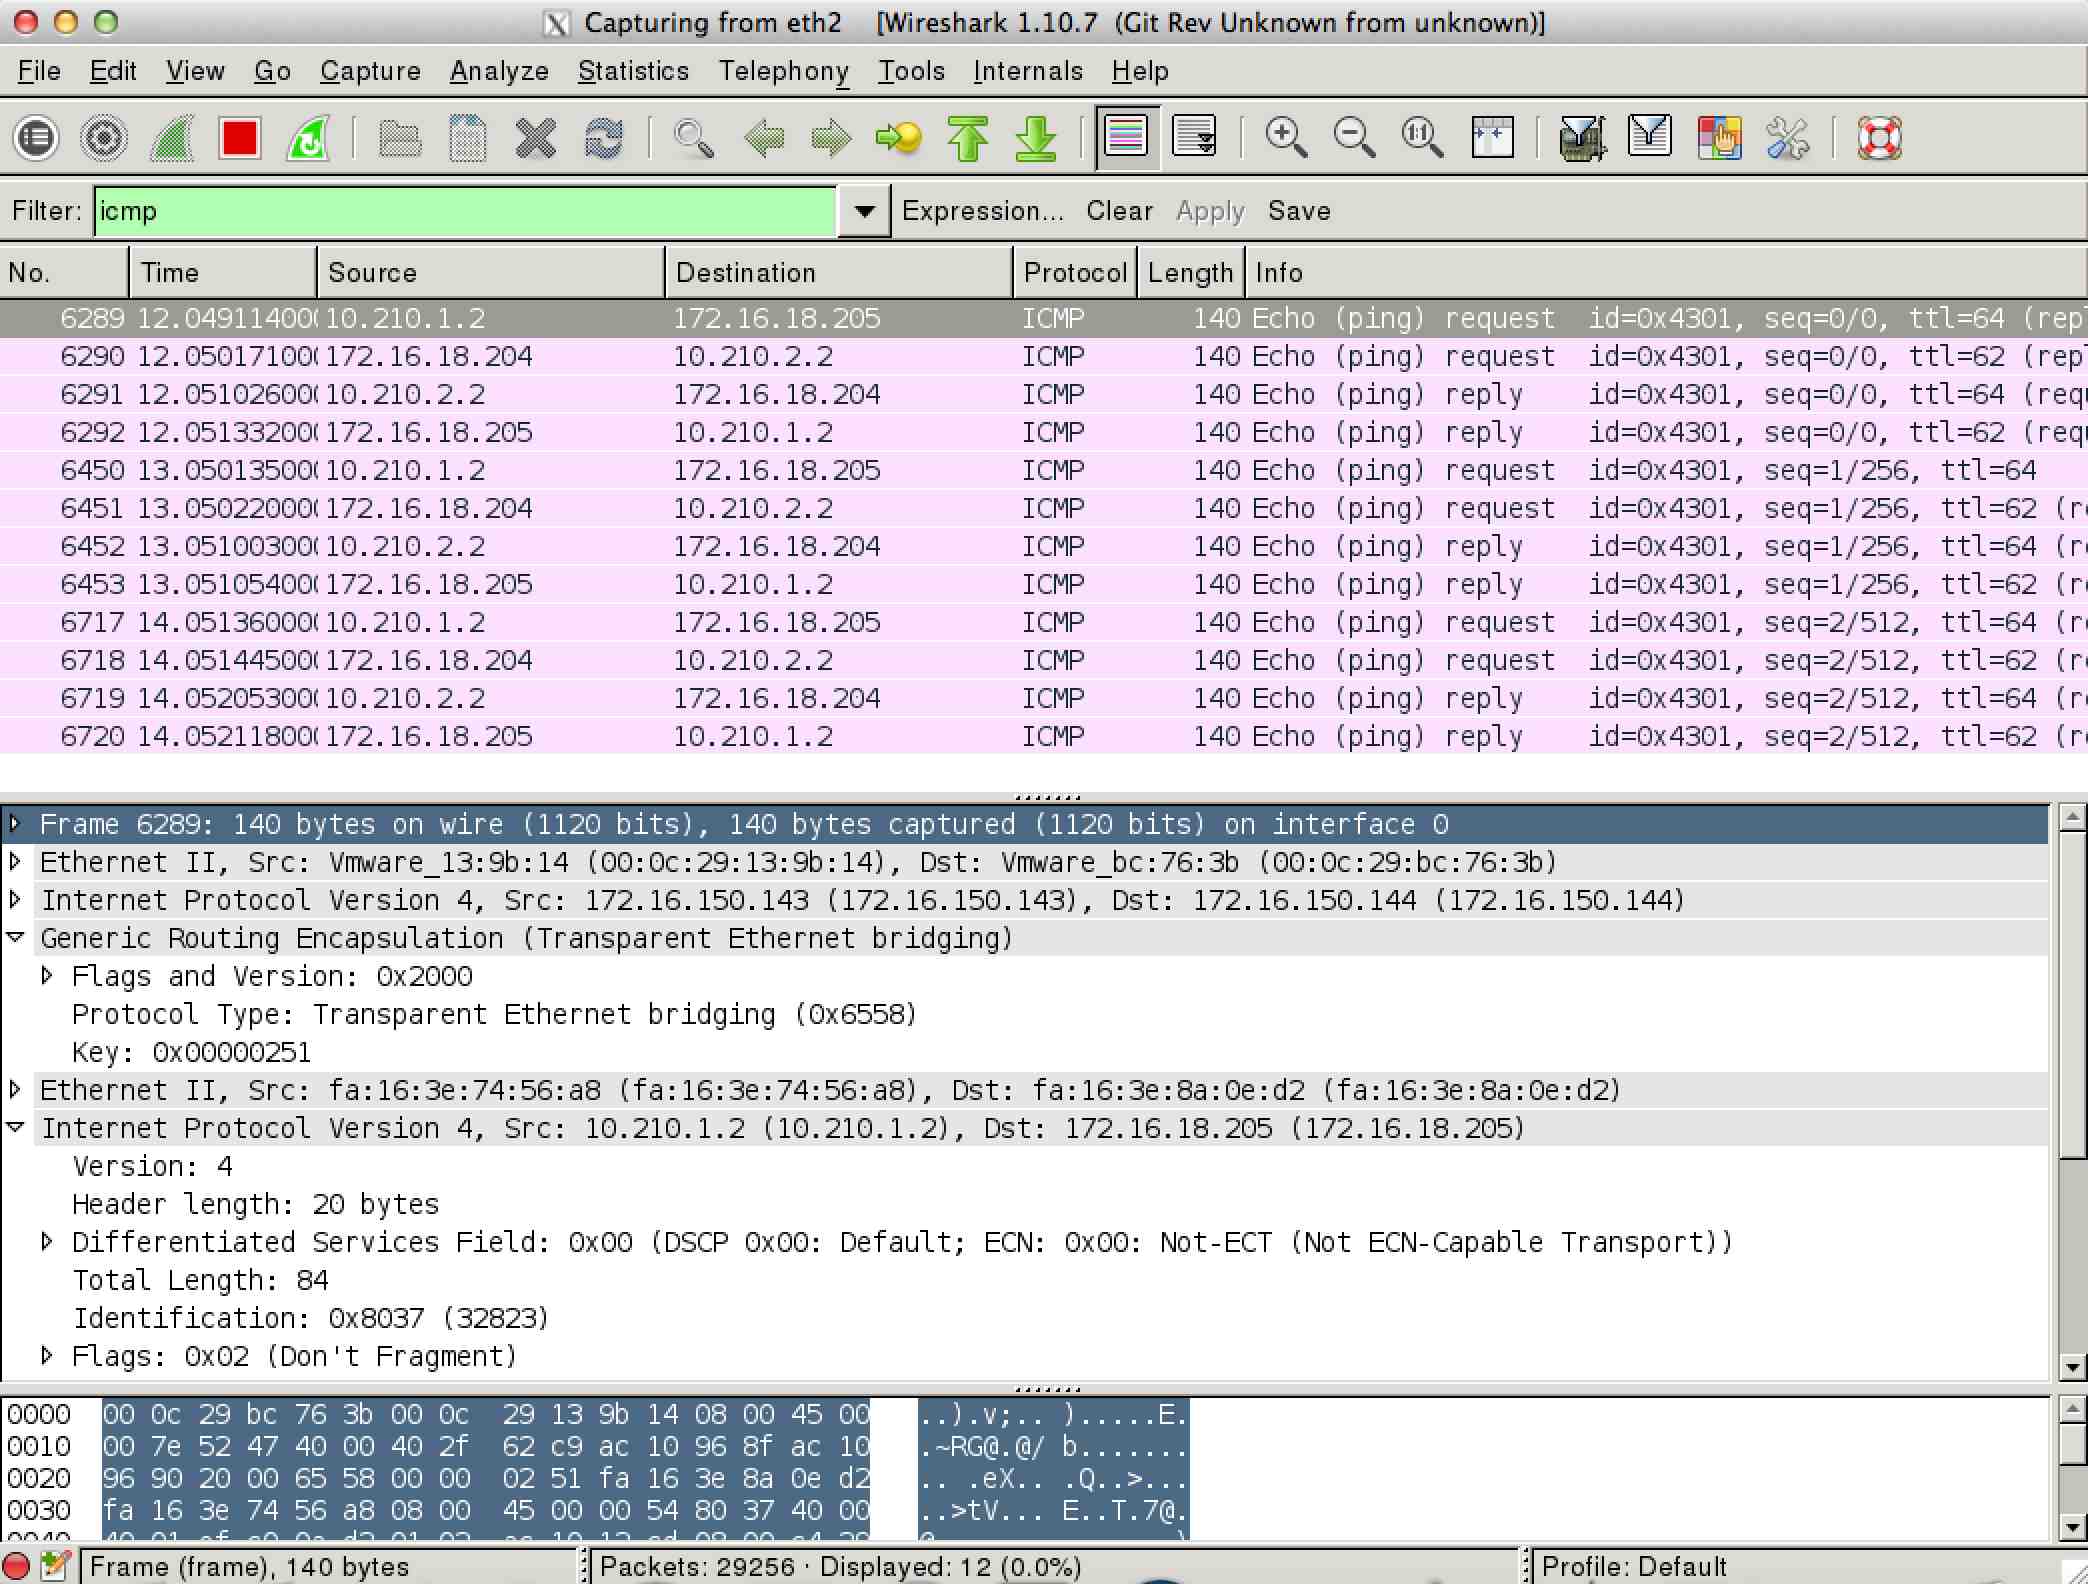
The picture below shows how coke tenant is able to ping a pepsi tenant, using the floating ip.


Extremely helpful links:
Comments
comments powered by Disqus