Openstack using Opendaylight to provide routing with floating ips
Opendaylight L3 Floating IPs
As you would expect, this is a continuation of part 2, where I will pick up where we left off and do some further playing with L3 forwarding to connect tenant vms to external networks.
Floating ips allow for a one-to-one mapping of a tenant's private address to a pool of addresses that are routable outside the tenant networks. The support for this functionality is now implemented in Opendaylight, starting at the Lithium release. The North<=>Southbound portion of the L3 forwarding is accomplished by using the NAT inbound/outbound tables in the net-virt pipeline, which are populated when Openstack dynamically informs Opendaylight about the floating ip assignments.
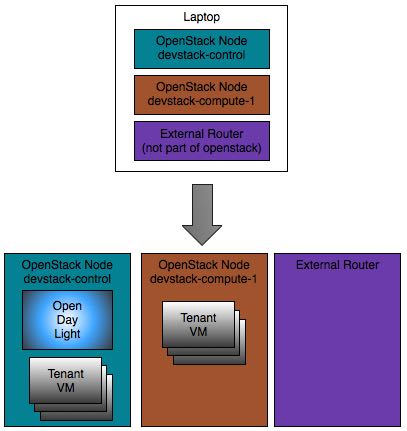
Preparing VMs
Since parts 1 and 2 of this talk used Helium, we will need to use a newer Opendaylight build in order to do North<=>Southbound. Also, I thought of using an extra VM to represent the external router that connects the Openstack nodes to the internet. My intent in doing so is to 1) minimize the dependency on the config of the local hypervisor; and 2) better expose the network connectivity we demonstrate here. The bad news is that you will need to deploy the VMs from scratch to do this demo; the good news is that this is pretty easy, as we leverage Vagrant to perform all the heavy lifting. I also took this opportunity to switch gears in terms of the linux distro used as the Openstack nodes. For that, let's use my personal favorite: Centos 7.1
Here is an overview of the VMs and their roles:
Installing VM to be used as External Router
To get the external router vm instantiated, use a github project I put together: router-node. The readme file spells out most of what it does. While the router VM's master branch will stamp out 3 internal networks, in this demo we will only use one of them: mylocalnet. Because of that, consider using the oneNet branch, as shown in the clone command below. By the way, if we had multiple external bridges (e.g. br-ex2, br-ex3) in the Openstack deployment is when it would make more sense to use additional internal networks to map them into.
In brief, this should be all you need to have the router vm running:
$ git clone -b oneNet https://github.com/flavio-fernandes/router-node.git
$ cd router-node
$ vagrant up  ; # this takes about 9 minutes on my macbook pro (Late 2013) ...
While the vagrant up command above is going, you may open up another shell console in your local system and clone another github project to provision the Openstack nodes. Please note we will be using a specific branch to pick up some scripts and config tailored to this tutorial:
$ git clone -b blogDemoLithium https://github.com/flavio-fernandes/devstack-nodes.git
$ cd devstack-nodes
$ vagrant up  ;  # this takes a little over 3 minutes
Go Devstack!
In order to configure Openstack, the Vagrant provisioning will pull in devstack -- Kilo release -- and add a local.conf file for each vm. That will be located at the /opt/devstack directory, inside each one of the Openstack (vm) nodes. One key thing to note here: even though the linux distro used is different from the previous demos, that does not affect what goes in local.conf at all.
Other than the fact that we are using the Lithium branch of the networking-odl plugin, the local.conf files should look very familiar to you, for both control and compute nodes. Assuming you read parts 1 and 2 of this series, of course. :)
Just like in parts 1 and 2 of this demo, stack.sh will download, install and start Opendaylight, inside the Openstack control node. That is accomplished by using ODL_MODE=allinone. Since that is the default mode, there is no need to have it explicitly mentioned. Otherwise, that would require the ODL_MODE to be provided, as described here.
One knob that is new here: the PUBLIC_INTERFACE, mentioned in all local.conf files. That param, in conjunction with ODL_L3=True, specifies what interface in the Openstack node gets used to connect br-ex to the network where the external gateway is attached. More on that will be described in section OVS Bridges in Compute Nodes, further down. The picture below shows the network topology from the Openstack nodes' perspective, as well as the vm used as external router.
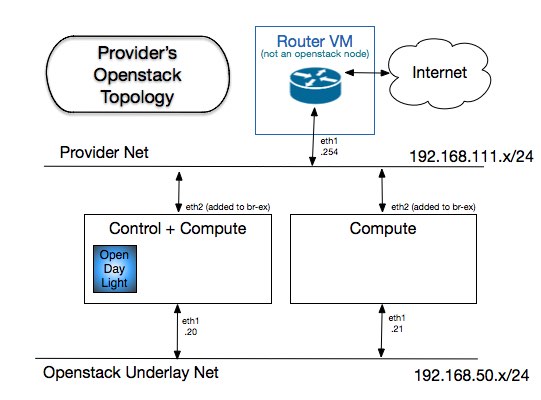
The element in both router-node and devstack-nodes that provides for the connectivity depicted above as the Provider Net is accomplished by using the same name for the interfaces that need to share a bridge in the local hypervisor: mylocalnet. All we care at this point is that: 1) they are called eth2 in the Openstack Nodes and eth1 in the external router vm, and 2) the ip address of eth1 of router-node is well known (i.e. 192.168.111.254). That address gets used when providing Openstack with the gateway of the external subnets, in Create Tenants step down below.
At this point, once you get everything to look the way you want, run the following scripts:
$ vagrant ssh devstack-control
$ cd /opt/devstack && ./stack.sh
### In my laptop, this first stack takes about 20 mins.

$ vagrant ssh devstack-compute-1
$ cd /opt/devstack && ./stack.sh
### In my laptop, this first stack takes about 7 mins.
In case you are thinking of doing the first stack in both devstack-control and devstack-compute-1 at the same time: Because ODL is going to be running from devstack-control and stacking in devstack-compute-1 is a lot quicker than in control, you may hit timeout in devstack-compute-1 if ODL is not up within 10 minutes. A work around for that is to either 1) wait about 10 minutes before starting stack in devstack-compute-1; or 2) use a big value for ODL_BOOT_WAIT (e.g. ODL_BOOT_WAIT=1200) in devstack-compute-1's local.conf.
Once that is done, you can 'lock down' the stack repo used by changing the OFFLINE and RECLONE values in local.conf (on both control and compute nodes). I added a handy script for doing that, as shown below:
$ /vagrant/puppet/scripts/lockStack.sh
$ diff -u /opt/devstack/local.conf{.orig,} | grep -E 'OFFLINE|RECLONE'
-#OFFLINE=True
-RECLONE=yes
+OFFLINE=True
+RECLONE=no
You can look at Opendaylight's log to see events percolating in as we make changes in Openstack. Since we are running ODL inside the VM, it may take a while longer for it to fully initialize. While that is happening, do not be alarmed by logs that say: "Mapped exception to response: 503 (Service Unavailable) javax.ws.rs.WebApplicationException". That is indicative of stack polling ODL before it its ready to play ball. The log is located here:
$ vagrant ssh devstack-control
$ tail -F /opt/stack/logs/screen-karaf.txt
Should you need to clean up the stack, as well as clearing OVS and logs: there is a super handy tool available in /opt/tools, thanks to Sam's tools repo. That will not only unstack, but make your Openstack node squeaky clean. ;)
[vagrant@devstack-control devstack]$ ../tools/osreset.sh
Just like in parts 1 and 2, the stacking step involves getting OVS in each of the nodes configured. You should be able to see that OVS is connected and bridge br-int was created. That must be the case before we do any further Openstack config, on both control and compute nodes:
vagrant@devstack-control:~/devstack$ sudo ovs-vsctl show
96c4b076-edbd-4a5a-b82b-da3def978a9c
Manager "tcp:192.168.50.20:6640"
    is_connected: true
Bridge br-ex
    Controller "tcp:192.168.50.20:6653"
        is_connected: true
    fail_mode: secure
    Port br-ex
        Interface br-ex
            type: internal
    Port "eth2"
        Interface "eth2"
Bridge br-int
    Controller "tcp:192.168.50.20:6653"
        is_connected: true
    fail_mode: secure
    Port br-int
        Interface br-int
            type: internal
ovs_version: "2.3.1"

vagrant@devstack-compute-1:~/devstack$ sudo ovs-vsctl show
7113c9b2-81a5-4210-a361-def669b77afc
Manager "tcp:192.168.50.20:6640"
    is_connected: true
Bridge br-int
    Controller "tcp:192.168.50.20:6653"
        is_connected: true
    fail_mode: secure
    Port br-int
        Interface br-int
            type: internal
Bridge br-ex
    Controller "tcp:192.168.50.20:6653"
        is_connected: true
    fail_mode: secure
    Port "eth2"
        Interface "eth2"
    Port br-ex
        Interface br-ex
            type: internal
ovs_version: "2.3.1"
Another critical piece in ODL that takes place even before we do any config in Openstack is the pipeline tables. This is what you will observe on all nodes:
$ sudo ovs-ofctl -O OpenFlow13 dump-flows br-int
OFPST_FLOW reply (OF1.3) (xid=0x2):
 cookie=0x0, duration=7174.158s, table=0, n_packets=0, n_bytes=0, priority=0 actions=goto_table:20
 cookie=0x0, duration=7176.050s, table=0, n_packets=0, n_bytes=0, dl_type=0x88cc actions=CONTROLLER:65535
 cookie=0x0, duration=7174.151s, table=20, n_packets=0, n_bytes=0, priority=0 actions=goto_table:30
 cookie=0x0, duration=7174.145s, table=30, n_packets=0, n_bytes=0, priority=0 actions=goto_table:40
 cookie=0x0, duration=7174.138s, table=40, n_packets=0, n_bytes=0, priority=0 actions=goto_table:50
 cookie=0x0, duration=7174.122s, table=50, n_packets=0, n_bytes=0, priority=0 actions=goto_table:60
 cookie=0x0, duration=7174.116s, table=60, n_packets=0, n_bytes=0, priority=0 actions=goto_table:70
 cookie=0x0, duration=7174.110s, table=70, n_packets=0, n_bytes=0, priority=0 actions=goto_table:80
 cookie=0x0, duration=7174.102s, table=80, n_packets=0, n_bytes=0, priority=0 actions=goto_table:90
 cookie=0x0, duration=7174.095s, table=90, n_packets=0, n_bytes=0, priority=0 actions=goto_table:100
 cookie=0x0, duration=7174.089s, table=100, n_packets=0, n_bytes=0, priority=0 actions=goto_table:110
 cookie=0x0, duration=7174.080s, table=110, n_packets=0, n_bytes=0, priority=0 actions=drop
BUG Alert, BUG Alert, BUG Alert! In a trial for this demo, I've hit a known bug where rules in br-ex bridge were not added. This is being tracked by bug 4135. To make sure this does not affect you, look at the rules for br-ex on both vms, and follow the steps shown if they are not there. I'm confident this will be fixed soon... sorry for the construction dust! ;)
[vagrant@devstack-compute-1 devstack]$ sudo ovs-ofctl -O OpenFlow13 dump-flows br-ex
OFPST_FLOW reply (OF1.3) (xid=0x2):
[vagrant@devstack-compute-1 devstack]$ sudo ovs-ofctl -O OpenFlow13  add-flow br-ex "priority=0, action=normal"
[vagrant@devstack-compute-1 devstack]$ sudo ovs-ofctl -O OpenFlow13  add-flow br-ex "dl_type=0x88cc, actions=CONTROLLER:65535"
[vagrant@devstack-compute-1 devstack]$
[vagrant@devstack-compute-1 devstack]$ sudo ovs-ofctl -O OpenFlow13 dump-flows br-ex
OFPST_FLOW reply (OF1.3) (xid=0x2):
 cookie=0x0, duration=15.660s, table=0, n_packets=2, n_bytes=218, priority=0 actions=NORMAL
 cookie=0x0, duration=5.198s, table=0, n_packets=1, n_bytes=109, dl_type=0x88cc actions=CONTROLLER:65535
OVS Bridges in Compute Nodes
From the info provided by the ovs-vsctl show command above, you may notice something different in regards to the bridges and their ports from the output of previous demos. Let's take a minute to talk about them here, starting with a picture.
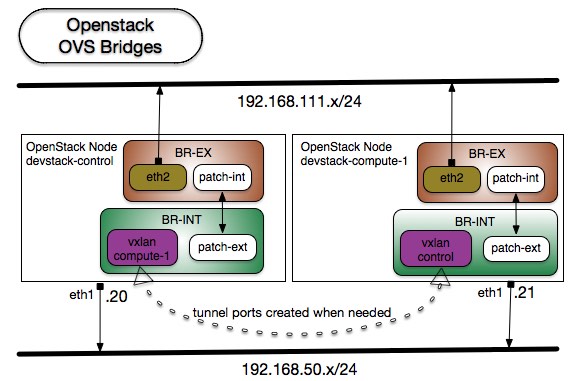
Because devstack-control is also a compute node, it will too have OVS connected to ODL and host tenant vms that end up with ports in the integration bridge (i.e. br-int). OVSDB's net-virt ODL_L3 implements a distributed virtual router; which means that every compute node has direct access to the external network. Thus, there is no extra hop that sits between the compute nodes and where it needs to reach; including the external gateway.
As mentioned earlier, the param PUBLIC_INTERFACE -- when provided -- will cause networking-odl to make such interface part of the br-ex bridge as part of the stacking process.
br-ex
Other than providing a familiar functionality to folks used to Openstack, this bridge is actually of little value to ODL but to contain the PUBLIC_INTERFACE. You can see that by looking at the boring output of the rules installed in it:
$ sudo ovs-ofctl -O OpenFlow13 dump-flows br-ex | cut -d',' -f3-
OFPST_FLOW reply (OF1.3) (xid=0x2):
 table=0, n_packets=571, n_bytes=29138, priority=0 actions=NORMAL
 table=0, n_packets=467, n_bytes=50903, dl_type=0x88cc actions=CONTROLLER:65535
This is the case because 100% of the work ODL performs to provide net-virt happens in the integration bridge. In the future, we may contemplate not creating br-ex at all when using Openstack with ODL, and simply add the PUBLIC_INTERFACE(s) to br-int directly. To inform ODL of what bridge ports (e.g. eth2) belong to what external networks, simple provisioning may be conveyed through OVS, similar to how this is done for local_ip and VLAN. By the way, that would eliminate the need of adding the PUBLIC_INTERFACE via the shell and simply let ODL do it via its native OVSDB library. But that is fun stuff for the future. For now, just know that ODL only uses br-ex to reach the external network. To link the pipeline rules in br-int to the external network, a patch port is created between the bridges, which is talked about in the next sub-section.
patch ports
When ODL is configured to perform L3, it will ensure that patch ports are in place to connect br-ex with br-int. That check/creation -- similar to the creation of the vxlan tunnels -- is done on demand. So, do not expect to see the patch ports until they are needed for connecting tenant vms to external subnet. The code for doing this in lithium is BridgeConfigurationManagerImpl.java
Having the patch port in br-int allows the net-virt code to deal with the PUBLIC_INTERFACE just like any other OF port local to the integration bridge. As you will see below, tables 30 and 100 will explicitly use this patch-port to handle the inbound/outbound packets that correspond to the floating ips.
Create Tenants and Tenant VMs
Just like in part 2, I'm making this part very similar to what was done in part 1. That is to keep it consistent with the format you already have seen.
Time to create tenant's external net and subnet. The script below shows how we can create multiple tenants to use the external bridge, while having their own pool of floating ips.
$ /vagrant/puppet/scripts/createTenants.sh
It is the job of the provider (not the tenant) to provision external access. So, by looking at the script's first lines you will notice that we are using the 'admin' user to perform the tasks of creating the tenants and their external subnets. The remainder script(s) -- on the other hand -- will use the tenant's user and password.
You can see the contents of createTenants.sh here
#!/bin/bash

set +x
set -e
cd /opt/devstack || { echo "cannot cd into devstack dir"; exit 1; }
source openrc admin admin
set -x

keystone tenant-create --name=tenant1 --enabled=true                     2> /dev/null
keystone user-create --name=user1 --pass=user1 --email=user1@example.com 2> /dev/null
keystone user-role-add --user=user1 --role=_member_ --tenant=tenant1     2> /dev/null

keystone tenant-create --name=tenant2 --enabled=true                     2> /dev/null
keystone user-create --name=user2 --pass=user2 --email=user2@example.com 2> /dev/null
keystone user-role-add --user=user2 --role=_member_ --tenant=tenant2     2> /dev/null

IMG_ID=$(nova image-list | grep 'cirros-0.3..-x86_64-uec\s' | tail -1 | awk '{print $2}')
TNT1_ID=$(keystone tenant-list 2> /dev/null | grep '\s'tenant1'' | awk '{print $2}')
TNT2_ID=$(keystone tenant-list 2> /dev/null | grep '\s'tenant2'' | awk '{print $2}')

# create external net for tenant1
neutron net-create ext1 --router:external --tenant_id=${TNT1_ID} --provider:network_type flat \
   --provider:physical_network physnetext1

neutron subnet-create --tenant_id=${TNT1_ID} \
   --allocation-pool start=192.168.111.21,end=192.168.111.40 --gateway=192.168.111.254 \
   --disable-dhcp --name subext1 ext1 192.168.111.0/24

# create external net for tenant2
neutron net-create ext2 --router:external --tenant_id=${TNT2_ID} --provider:network_type flat \
   --provider:physical_network physnetext2

neutron subnet-create --tenant_id=${TNT2_ID} \
   --allocation-pool start=192.168.111.41,end=192.168.111.60 --gateway=192.168.111.254 \
   --disable-dhcp --name subext2 ext2 192.168.111.0/24
The raw output I got when I ran that script is here
Notice how dhcp is disabled for the external subnets, with range of addresses for the pool in them explicitly given. In the external subnet is where the ip address of the external gateway (in the provider network) is made known to the tenants. In this demo, that is the ip address of the External Router VM's eth1 (i.e. 192.168.111.254); which was provisioned earlier in Installing VM to be used as External Router section above. Knowing the mac of this gateway takes some extra work, which we will talk about in the gateway arp resolver subsection, below.
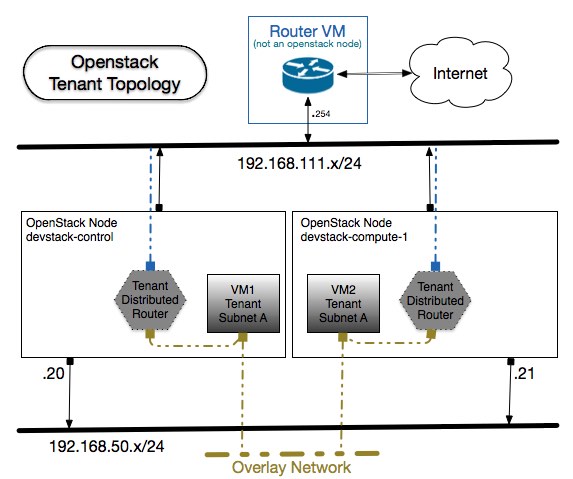
Next, let's use a script that sets the context of tenant1, creates a neutron router that uses the external network (i.e. ext1) and creates an internal net and subnet. Then, it will attach that network as interface to the router. Lastly, it stamps out 2 tenant vms and affiliates each one of them to a floating ip. Just as depicted above. As explained in part 2 the logic that accomplishes the routing functionality does not require a namespace, nor it uses any ports in the OVS bridge (br-int): it is simply a set of rules in the openflow table that makes it seem like there is a real 'box' represented by the neutron router.
$ /vagrant/puppet/scripts/createTenant1Vms.sh
You can see the contents of createTenant1Vms.sh here.
#!/bin/bash

set +x
cd /opt/devstack || { echo "cannot cd into devstack dir"; exit 1; }
source openrc admin admin

IMG_ID=$(nova image-list | grep 'cirros-0.3..-x86_64-uec\s' | tail -1 | awk '{print $2}')
TNT_ID=$(keystone tenant-list 2> /dev/null | grep '\s'tenant1'' | awk '{print $2}')

# Set into tenant1's context
unset SERVICE_TOKEN SERVICE_ENDPOINT
export OS_USERNAME=user1
export OS_TENANT_NAME=tenant1
export OS_PASSWORD=user1
export PS1='[\u@\h \W(keystone_user1)]\$ '

set -e
set -x

# Create an ssh key, if there is not one yet
if [[ ! -f id_rsa_demo || ! -f id_rsa_demo.pub ]]; then
    rm -f id_rsa_demo id_rsa_demo.pub
    ssh-keygen -t rsa -b 2048 -N '' -f id_rsa_demo
fi

nova keypair-add --pub-key id_rsa_demo.pub demo_key > /dev/null
neutron router-create rtr
neutron router-gateway-set rtr ext1

neutron net-create net1
neutron subnet-create net1 10.1.0.0/24 --name subnet1 --dns-nameserver 192.168.111.254
neutron router-interface-add rtr subnet1

neutron router-list

NET1_ID=$(neutron net-list | grep -w net1 | awk '{print $2}') ; echo "net1 $NET1_ID"

for VMNAME in vm1 vm2 ; do
    nova boot --poll --flavor m1.nano --image $IMG_ID --key-name demo_key --nic net-id=${NET1_ID} ${VMNAME}
    sleep 20

    neutron floatingip-create ext1
    FLOAT_IP=$(neutron floatingip-list | grep 192\.168\.111\. | grep -v 10\..\.0\. | head -1 | awk '{print $5}')
    echo "Assigning floating ip ${FLOAT_IP} to ${VMNAME}"
    nova floating-ip-associate ${VMNAME} ${FLOAT_IP}
done

nova list
The raw output I got when I ran that script is here
Note: There is also a script, in the same directory called createTenant2Vms.sh. I leave it to you to try it out and see for yourself how it affects the output of the commands below. Go for it, its fun! ;)
Some interesting commands to see what was created is shown here:
One very important characteristic of the external network we used is that it is a flat network. Because of that, there is no segmentation-id attribute associated with it. Thankfully, we don't need one due to the fact that the demuxing happens by virtue of the floating ip address mapped to the tenant vm. More on that will become clear when we talk about the inbound NAT table.
$ neutron net-show 733392a8-d474-431f-aa4f-d7d117264199
+---------------------------+--------------------------------------+
| Field                     | Value                                |
+---------------------------+--------------------------------------+
| admin_state_up            | True                                 |
| id                        | 733392a8-d474-431f-aa4f-d7d117264199 |
| mtu                       | 0                                    |
| name                      | ext1                                 |
| provider:network_type     | flat                                 |
| provider:physical_network | physnetext1                          |
| provider:segmentation_id  |                                      | <=== LOOK AT THAT!
| router:external           | True                                 |
| shared                    | False                                |
| status                    | ACTIVE                               |
| subnets                   | 32329d05-3b39-4d18-b5c3-13ee3a3a1583 |
| tenant_id                 | b89ab332649e40a8b0d817160493b356     |
+---------------------------+--------------------------------------+
Looking closely at the info obtained above, you can draw a pretty good picture of the macs and their location. This is a brief summary on that:
Tenant 1's id: b89ab332649e40a8b0d817160493b356
Network segmentation ID: 1090 (0x442)
MAC_1: fa:16:3e:36:43:ca IP: 10.1.0.1  Instance: - Host: -                  Desc: <Router Interface Net1> (ext1: 192.168.111.21)
MAC_2: fa:16:3e:e7:fc:a5 IP: 10.1.0.2  Instance: - Host: devstack-control   Desc: <DHCPd Net1>
MAC_3: fa:16:3e:0e:36:3f IP: 10.1.0.3  Instance: 1 Host: devstack-control   Desc: vm1 (ext1 float: 192.168.111.22)
MAC_4: fa:16:3e:fa:03:a0 IP: 10.1.0.4  Instance: 2 Host: devstack-compute-1 Desc: vm2 (ext1 float: 192.168.111.23)

Network segmentation ID: -
MAC_1: fa:16:3e:24:8f:05 IP: 192.168.111.21 Desc: <Router Interface ext1>
MAC_2: fa:16:3e:e1:b4:76 IP: 192.168.111.22 Desc: Floating IP, currently associated to vm1, in host devstack-control
MAC_3: fa:16:3e:2a:20:73 IP: 192.168.111.23 Desc: Floating IP, currently associated to vm2, in host devstack-compute-1
Note that every floating IP have their own unique MAC and neutron port. That plays a critical role when it comes to having ARPs replied for floating ips, as you will observe in table 20. Because a tenant vm maps to a known (and only one) compute node, the responsibility of which compute node handles any given floating ip is very easy to determine.
Looking at Packets
A tool that is very useful to observe the packets flowing in and out of the tenant vms is Wireshark. I have some instructions on installing and starting Wireshark in a the following page
http://www.flaviof.com/blog/work/how-to-openstack-from-vagrant.html#lookingAtPackets
Once installed, capture on eth1 of Openstack nodes to see traffic across nodes, and eth2 to see packets to addresses external to the tenants.
Looking at Horizon
Just like most Openstack deployments, you can get to Horizon. Use the following url to get to the one started in this demo:
http://192.168.50.20/
You can login using user: admin pass: admin or using user: user1 pass: user1

Peek and Poke around
We can -- of course -- play a bit to verify that tenant vms can reach each other and the mac/ip addresses are in agreement with what we saw from the Openstack commands. Also, to show how the tenant vms can reach the outside world, which makes use of the floating ips:
OVS vsctl show
Now, to the nuts and bolts of the plumbing: OVS ports/interfaces. In the control node we have the following:
[vagrant@devstack-control devstack]$ sudo ovs-vsctl show
e8a6e9ae-affa-4a82-9edd-13faffc0df68
    Manager "tcp:192.168.50.20:6640"
        is_connected: true
    Bridge br-ex
        Controller "tcp:192.168.50.20:6653"
            is_connected: true
        fail_mode: secure
        Port patch-int
            Interface patch-int
                type: patch
                options: {peer=patch-ext}
        Port br-ex
            Interface br-ex
                type: internal
        Port "eth2"
            Interface "eth2"
    Bridge br-int
        Controller "tcp:192.168.50.20:6653"
            is_connected: true
        fail_mode: secure
        Port "tap647bc6e8-35"
            Interface "tap647bc6e8-35"
                type: internal
        Port br-int
            Interface br-int
                type: internal
        Port patch-ext
            Interface patch-ext
                type: patch
                options: {peer=patch-int}
        Port "tapfb5df5ac-09"
            Interface "tapfb5df5ac-09"
        Port "vxlan-192.168.50.21"
            Interface "vxlan-192.168.50.21"
                type: vxlan
                options: {key=flow, local_ip="192.168.50.20", remote_ip="192.168.50.21"}
    ovs_version: "2.3.1"
[vagrant@devstack-control devstack]$
[vagrant@devstack-control devstack]$ sudo ovs-vsctl list Interface | grep -E '^name|^ofport |^mac_in_use|^external_id'
external_ids        : {}
mac_in_use          : "e2:ca:f1:94:f6:1a"
name                : patch-ext
ofport              : 2
external_ids        : {}
mac_in_use          : "ba:ca:6f:f3:45:4a"
name                : br-int
ofport              : 65534
external_ids        : {}
mac_in_use          : "08:00:27:85:f2:76"
name                : br-ex
ofport              : 65534
external_ids        : {}
mac_in_use          : "08:00:27:85:f2:76"
name                : "eth2"
ofport              : 1
external_ids        : {}
mac_in_use          : "be:23:5c:7c:ea:4a"
name                : "vxlan-192.168.50.21"
ofport              : 3
external_ids        : {attached-mac="fa:16:3e:0e:36:3f", iface-id="fb5df5ac-09a3-456c-9742-297412f20147", iface-status=active, vm-id="f34646c2-2f04-4b14-838d-d1068878da8c"}
mac_in_use          : "fe:16:3e:0e:36:3f"
name                : "tapfb5df5ac-09"
ofport              : 4
external_ids        : {}
mac_in_use          : "a6:92:35:de:56:f6"
name                : patch-int
ofport              : 2
external_ids        : {attached-mac="fa:16:3e:e7:fc:a5", iface-id="647bc6e8-35f7-4a9c-a71c-0a35024d30af", iface-status=active}
mac_in_use          : []
name                : "tap647bc6e8-35"
ofport              : 1
In the compute-1 node we have the following:
[vagrant@devstack-compute-1 ~]$ sudo ovs-vsctl show
ff53d3ea-08a6-4f50-8b1b-39ad21ee117f
    Manager "tcp:192.168.50.20:6640"
        is_connected: true
    Bridge br-ex
        Controller "tcp:192.168.50.20:6653"
            is_connected: true
        fail_mode: secure
        Port "eth2"
            Interface "eth2"
        Port patch-int
            Interface patch-int
                type: patch
                options: {peer=patch-ext}
        Port br-ex
            Interface br-ex
                type: internal
    Bridge br-int
        Controller "tcp:192.168.50.20:6653"
            is_connected: true
        fail_mode: secure
        Port "vxlan-192.168.50.20"
            Interface "vxlan-192.168.50.20"
                type: vxlan
                options: {key=flow, local_ip="192.168.50.21", remote_ip="192.168.50.20"}
        Port "tap6bcd7e56-b6"
            Interface "tap6bcd7e56-b6"
        Port br-int
            Interface br-int
                type: internal
        Port patch-ext
            Interface patch-ext
                type: patch
                options: {peer=patch-int}
    ovs_version: "2.3.1"
[vagrant@devstack-compute-1 ~]$
[vagrant@devstack-compute-1 ~]$
[vagrant@devstack-compute-1 ~]$ sudo ovs-vsctl list Interface | grep -E '^name|^ofport |^mac_in_use|^external_id'
external_ids        : {}
mac_in_use          : "ca:c1:4a:86:0d:43"
name                : br-int
ofport              : 65534
external_ids        : {}
mac_in_use          : "8a:c7:16:f7:78:bf"
name                : "vxlan-192.168.50.20"
ofport              : 1
external_ids        : {}
mac_in_use          : "08:00:27:04:f6:77"
name                : "eth2"
ofport              : 1
external_ids        : {attached-mac="fa:16:3e:fa:03:a0", iface-id="6bcd7e56-b693-4a84-aaee-e665e034b0dd", iface-status=active, vm-id="5180d1a1-3c6f-    463a-a0b0-2eafaec1aa02"}
mac_in_use          : "fe:16:3e:fa:03:a0"
name                : "tap6bcd7e56-b6"
ofport              : 2
external_ids        : {}
mac_in_use          : "d2:ec:72:ca:c7:23"
name                : patch-ext
ofport              : 3
external_ids        : {}
mac_in_use          : "08:00:27:04:f6:77"
name                : br-ex
ofport              : 65534
external_ids        : {}
mac_in_use          : "6e:b8:17:60:c1:0f"
name                : patch-int
ofport              : 2
[vagrant@devstack-compute-1 ~]$
I wrote a little tool that queries ODL's OVSDB md-sal (via restconf) and dumps a summary of all bridges and ports it knows about. Here is the output of that when I ran it in the test setup:
[vagrant@devstack-control devstack]$ /opt/tools/showOvsdbMdsal.py -f --ip 192.168.50.20
aliasMap:
  alpha      -> openflow:222931527798083
  bravo      -> openflow:8796756111990
  charlie    -> openflow:205378624374090
  delta      -> openflow:8796747658871

ovsdbNode:192.168.50.20:47526 mgr:192.168.50.20:6640 version:2.3.1
  bravo:br-ex
    of:1 eth2
    of:2 patch-int
  charlie:br-int
    of:1 tap647bc6e8-35 mac:fa:16:3e:e7:fc:a5 ifaceId:647bc6e8-35f7-4a9c-a71c-0a35024d30af
    of:2 patch-ext
    of:3 vxlan-192.168.50.21
    of:4 tapfb5df5ac-09 mac:fa:16:3e:0e:36:3f ifaceId:fb5df5ac-09a3-456c-9742-297412f20147
ovsdbNode:192.168.50.21:43748 mgr:192.168.50.20:6640 version:2.3.1
  alpha:br-int
    of:1 vxlan-192.168.50.20
    of:2 tap6bcd7e56-b6 mac:fa:16:3e:fa:03:a0 ifaceId:6bcd7e56-b693-4a84-aaee-e665e034b0dd
    of:3 patch-ext
  delta:br-ex
    of:1 eth2
    of:2 patch-int

ofLinks (discover via lldp):
  charlie:2 <-> bravo:2
  charlie:3 <-> alpha:1
  delta:1 <-> bravo:1
  delta:2 <-> alpha:3
Pipeline
Just as a quick recap, think of the pipeline services when looking at the rules in the Openstack nodes.
package org.opendaylight.ovsdb.openstack.netvirt.providers.openflow13;

public enum Service {
    CLASSIFIER ((short) 0, "Classifier"),
    DIRECTOR ((short) 10, "Director"),
    ARP_RESPONDER ((short) 20, "Distributed ARP Responder"),
    INBOUND_NAT ((short) 30, "DNAT for inbound floating-ip traffic"),
    EGRESS_ACL ((short) 40, "Egress Acces-control"),
    LOAD_BALANCER ((short) 50, "Distributed LBaaS"),
    ROUTING ((short) 60, "Distributed Virtual Routing (DVR)"),
    L3_FORWARDING ((short) 70, "Layer 3 forwarding/lookup service"),
    L2_REWRITE ((short) 80, "Layer2 rewrite service"),
    INGRESS_ACL ((short) 90, "Ingress Acces-control"),
    OUTBOUND_NAT ((short) 100, "DNAT for outbound floating-ip traffic <== revised! :)"),
    L2_FORWARDING ((short) 110, "Layer2 mac,vlan based forwarding");
}
In order to support floating ips, these are the tables that needed to be tinkered:
- ARP_RESPONDER, Table 20
- INBOUND_NAT, Table 30
- ROUTING, Table 60
- OUTBOUND_NAT, Table 100
More details on that is provided in the section below.
Here is what the openflow rules look like, from the control node:
Here is what the openflow rules look like, from the compute-1 node:
Notes on Table 0 (aka Classifier)
See part 1's classifier table of this blog for the details on that.
Notes on Table 20 (aka Distributed ARP Responder)
As mentioned above, every floating ip has its own unique mac address. That makes for a predictable mac to ip mapping, independent of the tenant it is associated with. All in all, the only additional implication floating ip causes to table 20 is that we need rules to reply on behalf of the active floating ips.
Since the arp queries for the floating ips will be coming from br-ex, the match of the arp rule use the patch port, instead of segmentation-id. That makes the rule a bit different than the others in this table. As you may recall, packets that ingress from the external network may not have a segmentation-id association, since it is likely a flat network. Lastly, notice how these specific rules are only needed in the Openstack node where the associated tenant is running. That's because there is no point in replying to ARP when tenant vm is unreachable... Never mind the fact that it makes coordination of which node replies to the arp query extremely simple and predictable. That is actually one of the complications introduced when mapping multiple tenants to a single floating ip (aka Single-Address NAT).
Concrete examples of this can be seen on the pipeline output above: Line 15 in control; Line 13 in compute-1.
For further info on this table, see part 2's L3_Fwd of this blog for the remainder details on that.
Notes on Table 30 (aka Inbound NAT)
This table is the table to handle packets coming in from the external network which are addressed to an associated floating ip. Packets that get matched in this category have their destination IP rewritten as the internal ip that belongs to the owner tenant vm. Additionally, this table makes use of register REG3, to specify the segmentation id that is part of the tenant's internal network. As mentioned in part 1, the tuple {segmentationId, ip address} is what makes an address overlap unique in Openstack. You will see the info on REG3 used on table 60, when packet is made to cross subnet boundaries.
table=30: MATCH: ip, in_port=${PATCH_TO_BR-EX}, nw_dst=${FLOATING_IP}
          ACTIONS: set_field:${TENANT_INTERNAL_IP}->ip_dst,
                   load:${SEGMENTATION_ID_OF_TENANT_NET}->NXM_NX_REG3[],
                   goto_table:40
Concrete examples of this can be seen on the pipeline output above: Line 17 in control; Line 15 in compute-1. The code used to populate this table is located here.
Notes on Table 60 (aka Distributed Virtual Routing)
The work performed at this table is the exact same as explained in part 2. However, it will also need to look out for packets that had the destination ip rewritten while in table 30. The caveat here is actually not related to the ip address at all, since table 30 takes care of that. The additional complication is that ingress packets will not have a segmentation-id information (aka tun_id) available since it came from a flat network. To handle that, we rely on no one other than register REG3; thanks to the action in table 30. Once match is met, the segmentation-id is set as an action clause and REG3 is not needed any further in the pipeline.
And that is all that is different here: instead of matching on tun_id to determine if the source network can be routed, it uses REG3 instead. You can see part 2's L3_Fwd of this blog for the gory details on everything else that happens here.
Concrete examples of this can be seen on the pipeline output above: Line 23 in control; Line 21 in compute-1.
Notes on Table 70 (aka L3_Fwd)
See part 2's L3_Fwd of this blog for the details on that.
Notes on Table 100 (aka Outbound NAT)
This table is the table to handle packets that need to head out the external network instead of simply being switched based on the destination {segmentation-id, MAC}. In here, we are looking for 2 potential cases:
- Send packet based on {segId, L3 network} destination tuple;
- Send packet out of br-ex.
1) Send packet based on {segId, L3 network} destination tuple
By matching on the segmentation-id and destination network, the packets that fall within this category are simple port based forwarding cases (at this point in the pipeline). Being so, there is nothing to be done at table 100, except for passing the puck to table 110.
Concrete examples of this can be seen on the pipeline output above: Line 33 in control; Line 31 in compute-1.
2) Send packet out of br-ex
By matching on specific A) segmentation-id; B) destination mac and C) source ip address, qualifying packets will get their source mac+ip address rewritten as the floating ip's, and 'routed' out of the patch port that connects the Openstack node to the external network.
table=100: MATCH: ip, tun_id=${SEGMENTATION_ID_OF_TENANT_NET},
                  dl_dst=${MAC_OF_ROUTER_INTERFACE_IN_TENANT_NET}
                  nw_src=${IP_OF_TENANT_VM_ASSOCIATED_WITH_FLOATING_IP}
         ACTIONS: set_field:${MAC_OF_FLOATING_IP}->eth_src,
                  dec_ttl,
                  set_field:${EXTERNAL_ROUTER_MAC}->eth_dst,  <= see below (MAC of ext gateway) for details
                  set_field:${FLOATING_IP}->ip_src,
                  output:${PATCH_TO_BR-EX}
One important thing to notice here is that the priority of the rules that match these packets is 512, which is lower than the rules for packets that are destined to one of the tenant's internal networks (i.e. case #1 above). This gives us the desired behavior of only sending packets out of br-ex when all potential internal destinations are exhausted.
Concrete examples of this can be seen on the pipeline output above: Line 31 in control; Line 29 in compute-1.
ARP'ing for MAC of external gateway
If you look closely at the outbound rules added to handle the floating ip, you will see an action for setting the destination MAC. That MAC is not explicitly provided by Neutron, and it represents the L2 next hop of the external gateway (i.e. 192.168.111.254). As an example, look at the rule extracted from compute-1 (line 29) for the floating ip 192.168.111.23:
MATCH: table=100, ..., tun_id=0x442, dl_dst=fa:16:3e:36:43:ca, nw_src=10.1.0.4
ACTIONS: set_field:fa:16:3e:2a:20:73->eth_src,
         dec_ttl,
         set_field:00:00:5e:00:01:01->eth_dst,  <=== RESOLVED MAC FOR EXT ROUTER!
         set_field:192.168.111.23->ip_src,
         output:3
Since this net-virt implementation does not have an IP stack at is disposal, figuring out the MAC of the external gateway requires special care. To accomplish that, we use a periodic timer that injects packets from the Openstack node via openflow's Packet OUT. The periodic nature of this resolver -- named Gateway ARP Resolver -- allows for the external gateway's MAC to change, which would trigger the rules in table 100 to refresh. It also handles cases when the external router is not reachable. This work is embodied in bug 3378 and was merged into Lithium not too long ago. Thanks Anil!
The code to resolve the external gateway's mac is located here. The code used to populate this table is located here.
Notes on Table 110 (aka L2_Fwd)
See part 1's l2 forwarding table of this blog for the details on that.
Final Thoughts
If you made it this far, you should have a better idea on how Opendaylight can be used with OVSDB's net-virt and Openstack's Floating IPs.
As mentioned earlier, further work is planned to handle NAT where multiple tenants across multiple compute nodes share a single ip address (aka Single-Address NAT/Overloading/Port-Based NAT). As simple as it sounds, this is actually a bit complex to implement in a distributed environment. That is so, because it introduces the need to orchestrate which node should answer to ARP queries, as well as dynamically map a table of udp/tcp ports over multiple compute nodes and their tenant vms. Scalability as well as reactive/proactive provisioning are very relevant here.
Just as talked about in final thoughts of part 2, the implementation does not respond to pings destined to the ip addresses assigned to the virtual router. I predict this will get addressed, as many more folks are getting involved. For a peek on the potentially new functionalities to work on, check out the trello board on OVSDB Beryllium.
Feeling aspired? If so, join in the fun!
Create More Tenants, subnets, VMs; Play with Floating IP associations
Just as in the end of parts 1 and 2, I leave it to you for going on more adventures. ;) Consider adding more compute nodes to see the vxlan tunnels created when tenant vms are instantiated in the new node. Everything done in parts 1 and 2 still apply, so adding more tenants and/or subnets is made to co-exist in the pipeline while isolation and connectivity are preserved.
Lastly, remember that floating ips can be disassociated from tenant vms at any time, doing so will trigger updates to the ip rewrite rules. Give it a try:
$ source openrc admin admin ; unset SERVICE_TOKEN SERVICE_ENDPOINT
$ export OS_USERNAME=user1 ; export OS_TENANT_NAME=tenant1 ; export OS_PASSWORD=user1
$ export PS1='[\u@\h user1]\$ '
[vagrant@devstack-control user1]$ nova list
...
[vagrant@devstack-control user1]$ sudo ovs-ofctl -O OpenFlow13 dump-flows br-int | grep 192.168.111.22
...
[vagrant@devstack-control user1]$ nova floating-ip-disassociate vm1 192.168.111.22
Some related links you may find interesting:
Comments
comments powered by Disqus