Openstack using Opendaylight to provide routing across tenant subnets
Opendaylight L3
As you would expect, this is a continuation of part 1, where I will pick up where we left off and do some further playing with pipelines to have L3 forwarding. At the time of this writing, the North<=>Southbound portion of the L3 forwarding is under development, but the East<=>West is finished. So, I will not talk much about floating IPs and br-ex in this page; that will make for a nice topic on part 3 of this series.
Clean up (from part 1)
To get going it is not necessary, but will make parsing the outputs easier on the eyes, if we unstack the existing nested vms. That is so, because we will create a new network topology for this tutorial, where tenants have multiple networks and a virtual router.
Thus, if you choose to clean-up from part 1, consider doing something like the commands below:
$ vagrant ssh devstack-compute-1
vagrant@devstack-compute-1:~$ cd ./devstack && ./unstack.sh > /dev/null 2>&1
vagrant@devstack-compute-1:~/devstack$ exit

$ vagrant ssh devstack-control
vagrant@devstack-control:~$ cd ./devstack && ./unstack.sh > /dev/null 2>&1
vagrant@devstack-control:~/devstack$ exit

$ vagrant reload
Stack!
We need to make no changes in local.conf from what we used in part 1 in order to get ODL L3 forwarding. However, I intentionally postponed mentioning of a few nuggets on local.conf; done explicitly for ODL L3. It was for keeping it bite-sized. ;) Let me talk about them here.
First, you can notice that the local.conf explicitly disables the Openstack L3 agent service. With that, creating a neutron router will not cause a router namespace instantiation in the node with neutron-service. In our case, the neutron-service is in the control node, but that matters very little because ODL's L3 is fully distributed -- similar to DVR.
Secondly, we must enable the L3 functionality in ODL. Since we are using the allinone ODL_MODE, enabling L3 forwarding is accomplished by setting ODL_L3=True. In cases where ODL is running externally, make sure to enable L3_FWD by setting ovsdb.l3.fwd.enabled=yes in the file etc/custom.properties. Just for sake of completeness, look here if you are curious to see how ODL_L3=True does that while configuring [local] ODL.
There are also additional knobs we need in local.conf to make Openstack know that ODL is doing the L3 forwarding. For that, look for Q_L3_ENABLED and the service_plugins lines in local.conf. More details on using this plugin is available here.
Everything else mentioned in part 1 in regards to local.conf still applies.
At this point, once you get everything to look the way you want, run the following scripts:
$ vagrant ssh devstack-control
$ cd devstack/ && ./stack.sh

### first stack can take a while.... time for coffee break?!?

$ vagrant ssh devstack-compute-1
$ cd devstack/ && ./stack.sh
Note: devstack is not the most stable environment, due to its high level of activity. If you hit an issue with stacking, use ./unstack.sh and/or vagrant reload; and start stack.sh over. Odds are you will not need that, tho.
Once that is done, you can 'lock down' the stack repo used by changing the following values in local.conf (on both control and compute nodes):
OFFLINE=True
RECLONE=no
Tenant L3 Topology
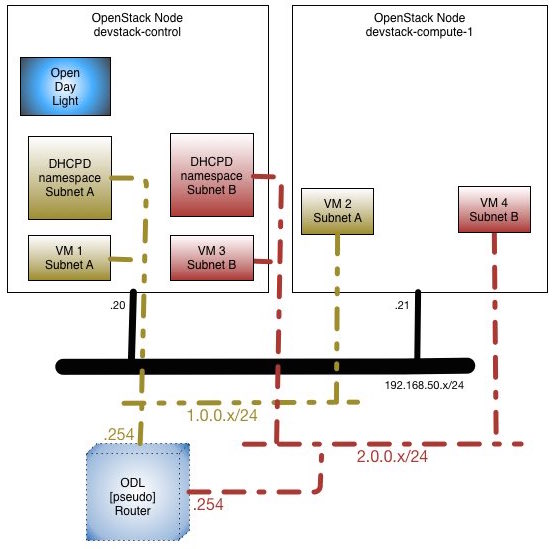
Here is the very simple network topology of the openstack nodes we will be using for this experiment:
Create Tenant VMs
I'm making this part very similar to what was done in part 1. That is to keep it consistent with the format you already have seen.
Time to create tenant with a router, and a couple of network and subnet with router interface attached. Then, we will add 4 tenant vms; 2 on each subnet. Just as shown in picture above.
vagrant@devstack-control:~/devstack$ /vagrant/puppet/scripts/createL3TenantAndVms.sh
You can see the contents of createL3TenantAndVms.sh here.
Some interesting commands to see what was created is shown here:
Looking closely at the info obtained above, you can draw a pretty good picture of the macs and their location. This is a brief summary on that:
Tenant 1's id: 971eaa6ec419466a8682e4bab64b51eb
Network segmentation ID: 1001 (0x3e9)
MAC_1: fa:16:3e:49:68:47 IP: 1.0.0.1   Instance: - Host: devstack-control   Desc: <DHCPd Net1>
MAC_2: fa:16:3e:32:d8:e8 IP: 1.0.0.2   Instance: 1 Host: devstack-control   Desc: 1_net1_vm1
MAC_3: fa:16:3e:4c:39:0e IP: 1.0.0.3   Instance: 2 Host: devstack-compute-1 Desc: 1_net1_vm2
MAC_4: fa:16:3e:69:5a:42 IP: 1.0.0.254 Instance: - Host: -                  Desc: <Router Interface Net1>

Network segmentation ID: 1002 (0x3ea)
MAC_1: fa:16:3e:a8:c2:66 IP: 2.0.0.1   Instance: - Host: devstack-control   Desc: <DHCPd Net2>
MAC_2: fa:16:3e:41:56:ec IP: 2.0.0.2   Instance: 1 Host: devstack-control   Desc: 1_net2_vm1
MAC_3: fa:16:3e:94:75:95 IP: 2.0.0.3   Instance: 2 Host: devstack-compute-1 Desc: 1_net2_vm2
MAC_4: fa:16:3e:cb:14:47 IP: 2.0.0.254 Instance: - Host: -                  Desc: <Router Interface Net2>
We can -- of course -- play a bit to verify that tenant vms can reach each other and the mac/ip addresses are in agreement with what we saw from the openstack commands:
vagrant@devstack-control:~/devstack$ sudo ip netns
qdhcp-a08a89e5-e0c6-4f96-aec0-496737e71d7d
qdhcp-2c7e686d-c16d-4741-a514-a76d9e9b73de
vagrant@devstack-control:~/devstack$ sudo ip netns exec $(sudo ip netns | head -2 | tail -1) bash
root@devstack-control:~/devstack# ip a s
1: lo: <LOOPBACK,UP,LOWER_UP> mtu 65536 qdisc noqueue state UNKNOWN group default
    link/loopback 00:00:00:00:00:00 brd 00:00:00:00:00:00
    inet 127.0.0.1/8 scope host lo
       valid_lft forever preferred_lft forever
    inet6 ::1/128 scope host
       valid_lft forever preferred_lft forever
7: tap9f750bfb-4a: <BROADCAST,MULTICAST,UP,LOWER_UP> mtu 1500 qdisc noqueue state UNKNOWN group default
    link/ether fa:16:3e:49:68:47 brd ff:ff:ff:ff:ff:ff
    inet 1.0.0.1/24 brd 1.0.0.255 scope global tap9f750bfb-4a
       valid_lft forever preferred_lft forever
    inet6 fe80::f816:3eff:fe49:6847/64 scope link
       valid_lft forever preferred_lft forever
root@devstack-control:~/devstack#
root@devstack-control:~/devstack# ssh -o UserKnownHostsFile=/dev/null -o StrictHostKeyChecking=no \
> -i /home/vagrant/devstack/id_rsa_demo cirros@1.0.0.2
Warning: Permanently added '1.0.0.2' (RSA) to the list of known hosts.
$ ip a s
1: lo: <LOOPBACK,UP,LOWER_UP> mtu 16436 qdisc noqueue
    link/loopback 00:00:00:00:00:00 brd 00:00:00:00:00:00
    inet 127.0.0.1/8 scope host lo
    inet6 ::1/128 scope host
       valid_lft forever preferred_lft forever
2: eth0: <BROADCAST,MULTICAST,UP,LOWER_UP> mtu 1500 qdisc pfifo_fast qlen 1000
    link/ether fa:16:3e:32:d8:e8 brd ff:ff:ff:ff:ff:ff
    inet 1.0.0.2/24 brd 1.0.0.255 scope global eth0
    inet6 fe80::f816:3eff:fe32:d8e8/64 scope link
       valid_lft forever preferred_lft forever
$ for x in 1 2 ; do for y in $(seq 3) ; do IP=${x}.0.0.${y} ; \
> echo -n "$IP --> " ; ping -q -t 3 -c 2 $IP | grep received ; done ; done
1.0.0.1 --> 2 packets transmitted, 2 packets received, 0% packet loss
1.0.0.2 --> 2 packets transmitted, 2 packets received, 0% packet loss
1.0.0.3 --> 2 packets transmitted, 2 packets received, 0% packet loss
2.0.0.1 --> 2 packets transmitted, 2 packets received, 0% packet loss
2.0.0.2 --> 2 packets transmitted, 2 packets received, 0% packet loss
2.0.0.3 --> 2 packets transmitted, 2 packets received, 0% packet loss
$
$ cat /proc/net/arp
IP address       HW type     Flags       HW address            Mask     Device
1.0.0.254        0x1         0x2         fa:16:3e:69:5a:42     *        eth0
1.0.0.3          0x1         0x2         fa:16:3e:4c:39:0e     *        eth0
1.0.0.1          0x1         0x2         fa:16:3e:49:68:47     *        eth0
$
$ ip route
default via 1.0.0.254 dev eth0
1.0.0.0/24 dev eth0  src 1.0.0.2
$
$ ssh 2.0.0.3

Host '2.0.0.3' is not in the trusted hosts file.
(fingerprint md5 6e:cc:55:65:5c:1e:68:a9:ff:d9:d9:bc:15:39:81:64)
Do you want to continue connecting? (y/n) y
cirros@2.0.0.3's password: cubswin:)
$ for x in 1 2 ; do for y in $(seq 3) ; do IP=${x}.0.0.${y} ; \
> echo -n "$IP --> " ; ping -q -t 3 -c 2 $IP | grep received ; done ; done
1.0.0.1 --> 2 packets transmitted, 2 packets received, 0% packet loss
1.0.0.2 --> 2 packets transmitted, 2 packets received, 0% packet loss
1.0.0.3 --> 2 packets transmitted, 2 packets received, 0% packet loss
2.0.0.1 --> 2 packets transmitted, 2 packets received, 0% packet loss
2.0.0.2 --> 2 packets transmitted, 2 packets received, 0% packet loss
2.0.0.3 --> 2 packets transmitted, 2 packets received, 0% packet loss
$
$ cat /proc/net/arp
IP address       HW type     Flags       HW address            Mask     Device
2.0.0.254        0x1         0x2         fa:16:3e:cb:14:47     *        eth0
2.0.0.2          0x1         0x2         fa:16:3e:41:56:ec     *        eth0
2.0.0.1          0x1         0x2         fa:16:3e:a8:c2:66     *        eth0
$
$ ip route
default via 2.0.0.254 dev eth0
2.0.0.0/24 dev eth0  src 2.0.0.3
$
$ exit
$ exit
Connection to 1.0.0.2 closed.
root@devstack-control:~/devstack# exit
exit
vagrant@devstack-control:~/devstack$
Now, to the nuts and bolts of the plumbing: OVS ports/interfaces. In the control node we have the following:
vagrant@devstack-control:~/devstack$ sudo ovs-vsctl show
65d2cad6-e0ed-4a57-869a-85686c485930
    Manager "tcp:192.168.50.20:6640"
        is_connected: true
    Bridge br-int
        Controller "tcp:192.168.50.20:6633"
            is_connected: true
        fail_mode: secure
        Port "tap83f1bf16-3c"
            Interface "tap83f1bf16-3c"
        Port br-int
            Interface br-int
                type: internal
        Port "tap9f750bfb-4a"
            Interface "tap9f750bfb-4a"
                type: internal
        Port "tapa1d116c9-93"
            Interface "tapa1d116c9-93"
                type: internal
        Port "tapad13ec08-42"
            Interface "tapad13ec08-42"
        Port "vxlan-192.168.50.21"
            Interface "vxlan-192.168.50.21"
                type: vxlan
                options: {key=flow, local_ip="192.168.50.20", remote_ip="192.168.50.21"}
    ovs_version: "2.3.2"
vagrant@devstack-control:~/devstack$
vagrant@devstack-control:~/devstack$ sudo ovs-vsctl list Interface | grep -E '^name|^ofport |^mac_in_use|^external_id'
external_ids        : {}
mac_in_use          : "4e:5d:25:d5:78:44"
name                : br-int
ofport              : 65534

external_ids        : {}
mac_in_use          : "72:8a:8e:af:52:57"
name                : "vxlan-192.168.50.21"
ofport              : 2

external_ids        : {attached-mac="fa:16:3e:41:56:ec", iface-id="ad13ec08-4271-493a-b827-b9182ee17c24", iface-status=active, vm-id="7c1e40e0-4c34-412e-92f4-3e5d3af8df64"}
mac_in_use          : "fe:16:3e:41:56:ec"
name                : "tapad13ec08-42"
ofport              : 5

external_ids        : {attached-mac="fa:16:3e:32:d8:e8", iface-id="83f1bf16-3c40-4919-b3a1-53c5f3b0c303", iface-status=active, vm-id="22b1e93e-1557-4598-9a79-8f9ff2667888"}
mac_in_use          : "fe:16:3e:32:d8:e8"
name                : "tap83f1bf16-3c"
ofport              : 4

external_ids        : {attached-mac="fa:16:3e:49:68:47", iface-id="9f750bfb-4af5-42df-8315-0f583562c4c6", iface-status=active}
mac_in_use          : []
name                : "tap9f750bfb-4a"
ofport              : 1

external_ids        : {attached-mac="fa:16:3e:a8:c2:66", iface-id="a1d116c9-93f8-4fe1-8ab2-bcbf47aa99b4", iface-status=active}
mac_in_use          : []
name                : "tapa1d116c9-93"
ofport              : 3
In the compute-1 node we have the following:
vagrant@devstack-compute-1:~$ sudo ovs-vsctl show
a31569c6-314f-41dd-972d-a75806b4ee3f
    Manager "tcp:192.168.50.20:6640"
        is_connected: true
    Bridge br-int
        Controller "tcp:192.168.50.20:6633"
            is_connected: true
        fail_mode: secure
        Port "vxlan-192.168.50.20"
            Interface "vxlan-192.168.50.20"
                type: vxlan
                options: {key=flow, local_ip="192.168.50.21", remote_ip="192.168.50.20"}
        Port "tapb58febde-6f"
            Interface "tapb58febde-6f"
        Port br-int
            Interface br-int
        Port "tap2a008646-41"
            Interface "tap2a008646-41"
    ovs_version: "2.3.2"
vagrant@devstack-compute-1:~$
vagrant@devstack-compute-1:~$ sudo ovs-vsctl list Interface | grep -E '^name|^ofport |^mac_in_use|^external_id'
external_ids        : {attached-mac="fa:16:3e:94:75:95", iface-id="2a008646-4110-4095-ae68-0d3c70c913fb", iface-status=active, vm-id="0b6d8e31-fa26-4315-ac44-7c87efc44aa7"}
mac_in_use          : "fe:16:3e:94:75:95"
name                : "tap2a008646-41"
ofport              : 3

external_ids        : {}
mac_in_use          : "0e:1e:92:c3:c7:5a"
name                : "vxlan-192.168.50.20"
ofport              : 1

external_ids        : {}
mac_in_use          : "7a:99:e4:26:40:46"
name                : br-int
ofport              : 65534

external_ids        : {attached-mac="fa:16:3e:4c:39:0e", iface-id="b58febde-6f38-445e-8bd4-11992e5ec03e", iface-status=active, vm-id="7e8bcaaf-26ad-4407-87a4-8e237923c12f"}
mac_in_use          : "fe:16:3e:4c:39:0e"
name                : "tapb58febde-6f"
ofport              : 2
One interesting fact to point out from the OVS commands above: While router interfaces have been created, there are no OVS ports/interfaces associated with the router's neutron ports! That is why I refer to the router as being 'pseudo' in the topology diagram. In summary, the router functionality comes entirely from the openflow rules we will soon get into; and that is not tied to an openstack node. Looking closely at the info obtained above, you can draw a pretty good picture of the mappings between each OVS interface and openstack's tenant vms; including the tunnel encapsulation between the nodes. This is a brief summary on that:
control  OF port: 1 --> MAC: fa:16:3e:49:68:47 IP: 1.0.0.1 Desc: <DHCPd Net1> ExtrnId: 9f750bfb-4af5-42df-8315-0f583562c4c6
control  OF port: 2 --> MAC: 72:8a:8e:af:52:57 IP: -       Desc: vxlan-192.168.50.21 (connects control to compute-1)
control  OF port: 3 --> MAC: fa:16:3e:a8:c2:66 IP: 2.0.0.1 Desc: <DHCPd Net2> ExtrnId: a1d116c9-93f8-4fe1-8ab2-bcbf47aa99b4
control  OF port: 4 --> MAC: fa:16:3e:32:d8:e8 IP: 1.0.0.2 Desc: 1_net1_vm1   ExtrnId: 83f1bf16-3c40-4919-b3a1-53c5f3b0c303
control  OF port: 5 --> MAC: fa:16:3e:41:56:ec IP: 2.0.0.2 Desc: 1_net2_vm1   ExtrnId: ad13ec08-4271-493a-b827-b9182ee17c24

compute1 OF port: 1 --> MAC: 0e:1e:92:c3:c7:5a IP: -       Desc: vxlan-192.168.50.20 (connects compute-1 to control)
compute1 OF port: 2 --> MAC: fa:16:3e:4c:39:0e IP: 1.0.0.3 Desc: 1_net1_vm2   ExtrnId: b58febde-6f38-445e-8bd4-11992e5ec03e
compute1 OF port: 3 --> MAC: fa:16:3e:94:75:95 IP: 2.0.0.3 Desc: 1_net2_vm2   ExtrnId: 2a008646-4110-4095-ae68-0d3c70c913fb
Back to Pipeline
Just as a quick recap, think of the pipeline services when looking at the rules in the openstack nodes.
package org.opendaylight.ovsdb.openstack.netvirt.providers.openflow13;

public enum Service {
    CLASSIFIER ((short) 0, "Classifier"),
    DIRECTOR ((short) 10, "Director"),
    ARP_RESPONDER ((short) 20, "Distributed ARP Responder"),
    INBOUND_NAT ((short) 30, "DNAT for inbound floating-ip traffic"),
    EGRESS_ACL ((short) 40, "Egress Acces-control"),
    LOAD_BALANCER ((short) 50, "Distributed LBaaS"),
    ROUTING ((short) 60, "Distributed Virtual Routing (DVR)"),
    L3_FORWARDING ((short) 70, "Layer 3 forwarding/lookup service"),
    L2_REWRITE ((short) 80, "Layer2 rewrite service"),
    INGRESS_ACL ((short) 90, "Ingress Acces-control"),
    OUTBOUND_NAT ((short) 100, "SNAT for traffic accessing external network"),
    L2_FORWARDING ((short) 110, "Layer2 mac,vlan based forwarding");
}
Here is what the openflow rules look like, from the control node:
Here is what the openflow rules look like, from the compute-1 node:
Notes on Table 0 (aka Classifier)
See part 1's classifier table of this blog for the details on that.
Notes on Table 20 (aka Distributed ARP Responder)
This table, as implied by the name, takes care of responding to arp for all the well known {segmentation,ipAddress} tuples. It does that, by leveraging some cool capabilities of the NXM extension, available in OVS since version 2.1.0. Here is a picture that shows the steps in the rules of this table:
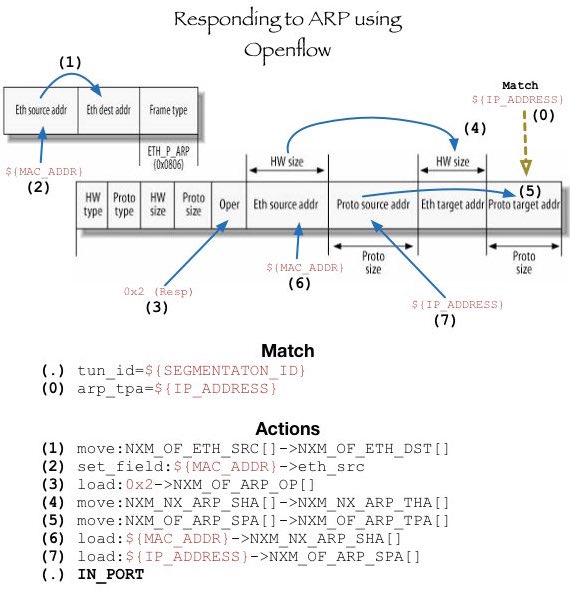
Since ODL knows of all the ip and mac addresses, this table is not hard to distribute across all nodes. Similar to L2 population, assembling this table allows for keeping broadcast ARP packets from leaving the openstack node, thus optimizing the link utilization across nodes. Note that this table includes ARP response rules for all router interfaces, as well as all the other neutron ports. (Lines 18,21 in control node; Lines 13,19 in compute-1)
Lastly, it is good to point out the last action in this rule: IN_PORT. With that, the newly assembled arp response is instructed to be sent out of the port it came in, and there is no further processing along the pipeline. The code used to populate this table is located here.
Notes on Tables 30 and 100 (aka NAT)
This is where interesting things happen in order to handle northbound/southbound packets. Since we are not doing that in this page, I'll postpone talking about it for now. Stay tuned for part 3 of this blog. For the time being, look at this link and here for the implementation on how the rule looks like.
Notes on Table 60 (aka Distributed Virtual Routing)
At this level, we are building the rules that allow for packets to hop across segmentation ids. In other words, we match on specific {segmentation_id,destinationL3Network} tuples to determine if packet needs to be routed. This table will build a full mesh of these tuples, so all subnets for a given tenant can be routed from/to each other. In this example this table is small because there are only 2 subnets; but you can have more for a given tenant to see all allowed permutations being programed. To give you an idea of what to expect, think of this excerpt:
2 Subnets: A, B
  - A->B  MATCH: from tun_id of subnet A, packet with dest network B
  - B->A  MATCH: from tun_id of subnet B, packet with dest network A

3 Subnets: A, B, C
  - A->B  MATCH: from tun_id of subnet A, packet with dest network B
  - A->C  MATCH: from tun_id of subnet A, packet with dest network C
  - B->A  MATCH: from tun_id of subnet B, packet with dest network A
  - B->C  MATCH: from tun_id of subnet B, packet with dest network C
  - C->A  MATCH: from tun_id of subnet C, packet with dest network A
  - C->B  MATCH: from tun_id of subnet C, packet with dest network B

...
For scaling sake, further work can be done here, so the matching portion can be broken up for reuse. What is important is that for every permutation, the action will (1) decrease TTL, (2) rewrite src MAC with the mac of the router interface on the destination network and (3) change the tun_id to match the segmentation of the corresponding destination subnet. (Lines 30,31 in control node; Lines 26,27 in compute-1)
Lastly, it is good to mention that if ttl becomes invalid, OVS is kind enough to drop the packet instead of moving on with the pipeline. You can easily prove that by experimenting with the '-t' parameter in ping, as shown.
The code used to populate this table is located here.
Notes on Table 70 (aka L3_Fwd)
This table can be thought as the 'second half' of table 60. Its purpose in life is to finish the L2 assembling of the routed packet, by setting the destination MAC based on the source IP address of the packet. By doing that, we are bypassing the ARP query that a regular router would normally have to do in order to determine the destination MAC for the packet in the destination network. Another way of looking at this table is that it does a reverse lookup of table 20, and determines what MAC to use for a given host IP address. (Lines 33-38 in control node; Lines 29-34 in compute-1)
At the end of table 70, the packet we are left with is finished going through the 'routing' path and all we are left to do is to think of it in terms of L2 switching. Thus, it is correct to say that we route on ingress, because all the L3 work is done by the first openstack node where packet is received. The code used to populate this table is located here.
Notes on Table 110 (aka L2_Fwd)
See part 1's l2 forwarding table of this blog for the details on that.
Final thoughts (on part 2)
If you made it this far, you should have a better idea on how Opendaylight can be used with OVSDB's net-virt in order to route packets. As mentioned earlier, further work is ongoing to handle the NAT needed for floating-ips, but the openflow rules for accomplishing that are already in place.
One functionality gap that is yet to be addressed is in regards to handling exceptions, such as icmp redirect or ttl expired. Some discussions on that topic can be seen in Dave's blog. Its good to also point out that even though we tackled responding to ARPs, we currently do not respond to pings destined to the ip addresses assigned to the virtual router.
This net-virt implementation is not the only one in ODL. There is a lot of activity in the GBP project to produce another way by which ODL can integrate with Openstack. Last but not least, there is also interesting work happening with Open Virtual Network, which will make net-virt a lot simpler to SDN controllers like ODL. Russel has done an awesome job in talking about the progress in that project. All that means to me, is that there are lots of fun to be had in this space. ;)
Create More Tenants, more subnets, more VMs
Just as in the end of part 1, I leave it to you for further explorations. ;) Consider running the createL3TenantAndVms.sh script with a few more tenants, and varying subnet and vm values to fully soak in how the rules get affected. Have fun!
vagrant@devstack-control:~/devstack$ export TNT_ID=2 ; export SUBNETS_PER_TENANT=3 ; export VMS_PER_SUBNET=3 ; \
                                     /vagrant/puppet/scripts/createL3TenantAndVms.sh

vagrant@devstack-control:~/devstack$ source openrc l3user${TNT_ID} l3tenant${TNT_ID} ; export OS_PASSWORD=l3user${TNT_ID} ; \
                                     neutron port-list
Some related links you may find interesting:
Comments
comments powered by Disqus