Using Vagrant to create vm nodes; devstack to start openstack using Opendaylight as ML2.
Openstack with Opendaylight deployment
Starting Openstack with Opendaylight has gotten a bit easier, but it is still something many folks have not done due to the potential pitfalls involved. In this page, I will show a few steps using Vagrant to stamp out 2 nodes to get the ball rolling. I will also focus on how ODL's OVSDB implementation creates a pipeline table [of openflow rules], that provides for tenant isolation on network overlay.
To keep it simpler, I will have Opendaylight running inside the Openstack's control node. That saves us from using another VM or running ODL in the host system. That is not a big deal for this experiment. Also in name of simplicity, I will refrain from getting into pipeline rules on L3 forwarding -- which is actually a fun subject I've been playing with. We'll save that for part 2 of this blog.
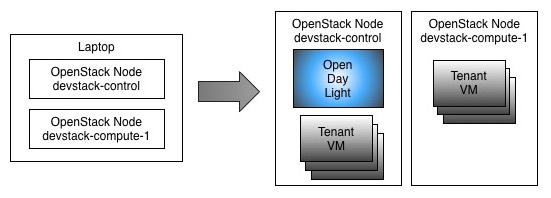
A simple diagram to show the vms (and their nested vms) is here:

To get things going faster, I'm assuming that you have a hypervisor and Vagrant installed. I use Virtual Box, but you should be able to use anything supported by Vagrant. The only caveat on that is that you may need to hunt for a Vagrant box that suits your hypervisor. The Bento project may be a good place for that, if you are in such predicament. :) To help folks running Vmware fusion, I've already added hooks in the Vagrantfile.
Start off by cloning this github project. Please note we will be using a specific branch to pick up some scripts and config tailored to this tutorial:
$ git clone -b blogDemo https://github.com/flavio-fernandes/devstack-nodes.git odldemo
$ cd odldemo
The Vagrantfile is here. That uses puppet standalone mode, which uses hosts.json, located under puppet/hieradata. Feel free to change any values to make sense to your system config. After that, all you need to do is:
$ time vagrant up ; # this can take a little over 18 minutes on my macbook pro (Late 2013) ...
Go Devstack!
In order to configure Openstack, the Vagrant provisioning will pull in devstack -- Kilo release -- and add a local.conf file for each vm. That will be located at /home/vagrant/devstack directory. A few highlights on the local.conf is in order.
First, you can notice that all vms are using the OpenDaylight ML2 MechanismDriver as plugin. That is accomplished by adding enable_plugin networking-odl as shown in local.conf for control and compute nodes. More details on using this plugin is available here. Note that in the enable_plugin syntax you can specify different git repo than the official one, as well as any branch. If no branch is specified, it will use master. For sake of this blog, I'm using my forked Github repo, branch heliumkilo, which contains some specific tweaks needed.
Secondly, since ODL is running in the allinone mode and that is the default, there is no need to have it explicitly mentioned. Otherwise, that would require the ODL_MODE to be provided, as described here. Together with that, note that the ip address used to describe where ODL is has the same value as the control node. When launching ODL externally, make sure to load the following karaf feature: feature:install odl-ovsdb-openstack. You can do that at the Karaf prompt or in the file etc/org.apache.karaf.features.cfg. The ODL provisioning script for allinone does that as shown here.
Another attribute in local.conf to point out is the ODL_PORT. When ODL is co-located with control, there is a potential for the northbound neutron server in ODL to conflict with Swift. However, ODL will use port 8080 by default and networking-odl (i.e. the ml2) needs to be aware of that. This is particularly important when we are not using the allinone mode. Since in this experiment we have Swift disabled, we can let co-located ODL 'own' 8080.
Lastly, I would like to mention about ODL_BOOT_WAIT in local.conf. Because I'm using VMs in a laptop and ODL takes a while to load up all the bundles at start up, I need to make stack wait for a bit. Short of doing that could expose a bug where net-virt is not ready, but OVS southbound events may come in too early. Addressing this issue is in the Lithium roadmap.
At this point, once you get everything to look the way you want, run the following scripts:
$ vagrant ssh devstack-control
$ cd devstack/ && ./stack.sh

### first stack can take a while.... time for coffee break?!?

$ vagrant ssh devstack-compute-1
$ cd devstack/ && ./stack.sh
Note: devstack is not the most stable environment, due to its high level of activity. If you hit an issue with stacking, use ./unstack.sh and/or vagrant reload; and start stack.sh over. Odds are you will not need that, tho.
Once that is done, you can 'lock down' the stack repo used by changing the following values in local.conf (on both control and compute nodes):
OFFLINE=True
RECLONE=no
Tenants Topology
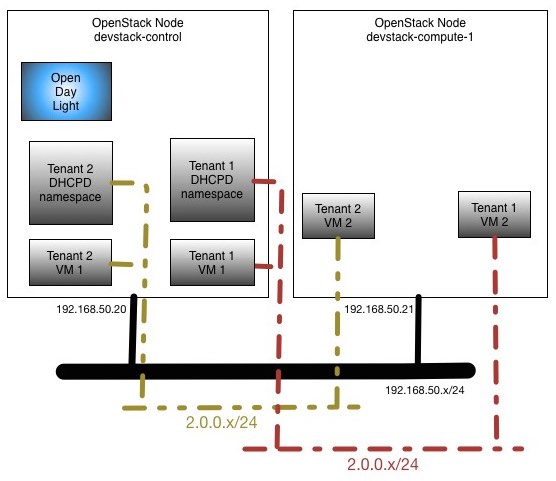
Here is the very simple network topology of the openstack nodes we will be using for this experiment:

Since part of the stacking involves getting OVS in each of the nodes connecting to ODL as manager, you should be able to see that OVS is connected and bridge br-int was created. That must be the case before we do any further openstack config, on both control and compute nodes:
vagrant@devstack-control:~/devstack$ sudo ovs-vsctl show
39745b5b-2ff9-416b-ab3e-f1b81fd29fd7
    Manager "tcp:192.168.50.20:6640"
        is_connected: true
    Bridge br-int
        Controller "tcp:192.168.50.20:6633"
            is_connected: true
        fail_mode: secure
        Port br-int
            Interface br-int
                type: internal
    ovs_version: "2.3.2"

vagrant@devstack-compute-1:~/devstack$ sudo ovs-vsctl show
6a894e1d-05d8-49be-8359-a09978281b36
    Manager "tcp:192.168.50.20:6640"
        is_connected: true
    Bridge br-int
        Controller "tcp:192.168.50.20:6633"
            is_connected: true
        fail_mode: secure
        Port br-int
            Interface br-int
    ovs_version: "2.3.2"
Another critical piece in ODL that takes place even before we do any config in openstack is the pipeline tables.
ODL OVSDB Net-Virt Pipelining
Looking at the openflow 1.3 table in br-int, this is what you will observe on all nodes:
$ sudo ovs-ofctl -O OpenFlow13 dump-flows br-int
OFPST_FLOW reply (OF1.3) (xid=0x2):
 cookie=0x0, duration=8558.311s, table=0, n_packets=0, n_bytes=0, priority=0 actions=goto_table:20
 cookie=0x0, duration=8559.262s, table=0, n_packets=0, n_bytes=0, dl_type=0x88cc actions=CONTROLLER:65535
 cookie=0x0, duration=8557.816s, table=20, n_packets=0, n_bytes=0, priority=0 actions=goto_table:30
 cookie=0x0, duration=8557.291s, table=30, n_packets=0, n_bytes=0, priority=0 actions=goto_table:40
 cookie=0x0, duration=8556.776s, table=40, n_packets=0, n_bytes=0, priority=0 actions=goto_table:50
 cookie=0x0, duration=8556.273s, table=50, n_packets=0, n_bytes=0, priority=0 actions=goto_table:60
 cookie=0x0, duration=8555.772s, table=60, n_packets=0, n_bytes=0, priority=0 actions=goto_table:70
 cookie=0x0, duration=8555.254s, table=70, n_packets=0, n_bytes=0, priority=0 actions=goto_table:80
 cookie=0x0, duration=8554.751s, table=80, n_packets=0, n_bytes=0, priority=0 actions=goto_table:90
 cookie=0x0, duration=8554.247s, table=90, n_packets=0, n_bytes=0, priority=0 actions=goto_table:100
 cookie=0x0, duration=8553.745s, table=100, n_packets=0, n_bytes=0, priority=0 actions=goto_table:110
 cookie=0x0, duration=8553.238s, table=110, n_packets=0, n_bytes=0, priority=0 actions=drop
The reason for these rules is to provide an internal abstraction to the net-virt codebase, where different services can co-exist in br-int. The code that triggers these rules lives here and is identified in the Service enumeration:
package org.opendaylight.ovsdb.openstack.netvirt.providers.openflow13;

public enum Service {
    CLASSIFIER ((short) 0, "Classifier"),
    DIRECTOR ((short) 10, "Director"),
    ARP_RESPONDER ((short) 20, "Distributed ARP Responder"),
    INBOUND_NAT ((short) 30, "DNAT for inbound floating-ip traffic"),
    EGRESS_ACL ((short) 40, "Egress Acces-control"),
    LOAD_BALANCER ((short) 50, "Distributed LBaaS"),
    ROUTING ((short) 60, "Distributed Virtual Routing (DVR)"),
    L3_FORWARDING ((short) 70, "Layer 3 forwarding/lookup service"),
    L2_REWRITE ((short) 80, "Layer2 rewrite service"),
    INGRESS_ACL ((short) 90, "Ingress Acces-control"),
    OUTBOUND_NAT ((short) 100, "SNAT for traffic accessing external network"),
    L2_FORWARDING ((short) 110, "Layer2 mac,vlan based forwarding");
}
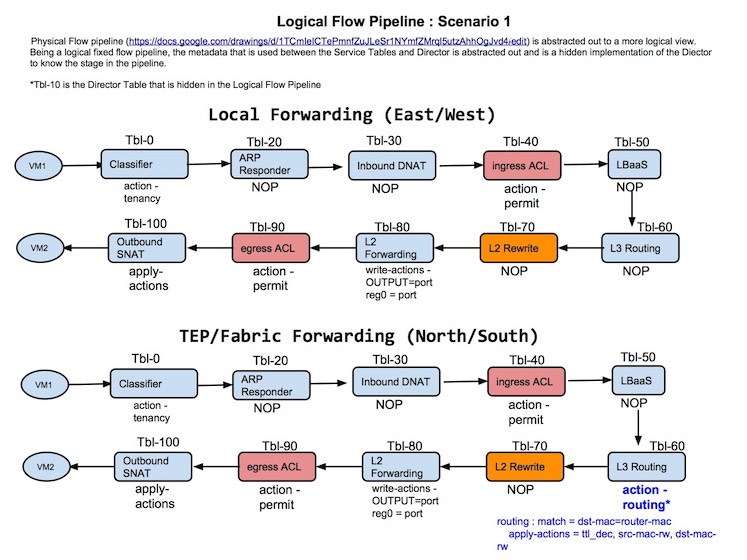
To give you an idea of how this gets used, consider the case where 2 tenant vms are trying to talk to each other. With that in mind, a potential example of how a packet would traverse the tables would be:

Note: The picture above does not have the current values associated to each service, yet it has historic value and still gives a good notion of what the pipeline is achieving. In other words, please do not pore over the values depicted (just get the idea behind it). :)
A future enhancement would be to include the notion of a director, which could influence the natural "flow" across the tables. That concept is on the shelf until a real world need arrives. The placeholder for director is shown as table 10.
Create Tenants
Now, let's get a little more real by creating a simple config in openstack. For that, we will create tenant1, add a network and subnet. Then, we will add 2 tenant1 vms. Just as shown in picture above.
vagrant@devstack-control:~/devstack$ /vagrant/puppet/scripts/createTenantAndVms.sh
You can see the contents of createTenantAndVms.sh here.
Some interesting commands to see what was created is shown here:
vagrant@devstack-control:~/devstack$ source openrc admin admin
vagrant@devstack-control:~/devstack$ nova list --all

+--------------------------------------+-------+----------------------------------+--------+------------+-------------+-------------+
| ID                                   | Name  | Tenant ID                        | Status | Task State | Power State | Networks    |
+--------------------------------------+-------+----------------------------------+--------+------------+-------------+-------------+
| bb16d68b-fffd-4816-a5ee-7b127172f330 | 1_vm1 | 097f695f8e214745984750ee7400814f | ACTIVE | -          | Running     | int=2.0.0.2 |
| c6bde77a-b196-4e6f-a2eb-23da250fe146 | 1_vm2 | 097f695f8e214745984750ee7400814f | ACTIVE | -          | Running     | int=2.0.0.3 |
+--------------------------------------+-------+----------------------------------+--------+------------+-------------+-------------+

vagrant@devstack-control:~/devstack$ nova show bb16d68b-fffd-4816-a5ee-7b127172f330 | grep -E ':host|\sname\s|instance_name'
| OS-EXT-SRV-ATTR:host                 | devstack-control                                               |
| OS-EXT-SRV-ATTR:instance_name        | instance-00000001                                              |
| name                                 | 1_vm1                                                          |

vagrant@devstack-control:~/devstack$ nova show c6bde77a-b196-4e6f-a2eb-23da250fe146 | grep -E ':host|\sname\s|instance_name'
| OS-EXT-SRV-ATTR:host                 | devstack-compute-1                                             |
| OS-EXT-SRV-ATTR:instance_name        | instance-00000002                                              |
| name                                 | 1_vm2                                                          |

vagrant@devstack-control:~/devstack$ neutron port-list
+--------------------------------------+------+-------------------+--------------------------------------------------------------------------------+
| id                                   | name | mac_address       | fixed_ips                                                                      |
+--------------------------------------+------+-------------------+--------------------------------------------------------------------------------+
| 085eeb79-ac3e-4e61-a0ae-91b30cc48fbd |      | fa:16:3e:46:64:2b | {"subnet_id": "fc835a11-15e7-4209-9183-84c84cf42603", "ip_address": "2.0.0.1"} |
| 3d803796-dc00-4f81-872e-dce10947f478 |      | fa:16:3e:37:be:fa | {"subnet_id": "fc835a11-15e7-4209-9183-84c84cf42603", "ip_address": "2.0.0.2"} |
| 4c6f3e8f-02f8-4f7e-bc6b-10ff2b95d612 |      | fa:16:3e:46:db:d5 | {"subnet_id": "fc835a11-15e7-4209-9183-84c84cf42603", "ip_address": "2.0.0.3"} |
+--------------------------------------+------+-------------------+--------------------------------------------------------------------------------+

vagrant@devstack-control:~/devstack$ neutron subnet-show fc835a11-15e7-4209-9183-84c84cf42603 | grep 'network_id'
| network_id        | aca80f95-c909-430e-bb31-98d1871aee53     |

vagrant@devstack-control:~/devstack$ neutron net-show aca80f95-c909-430e-bb31-98d1871aee53 | grep segmentation_id
| provider:segmentation_id  | 1001
Looking closely at the info obtained above, you can draw a pretty good picture of the macs and their location. This is a brief summary on that:
Tenant 1's id: 097f695f8e214745984750ee7400814f
Network segmentation ID: 1001 (0x3e9)
MAC_1: fa:16:3e:46:64:2b IP: 2.0.0.1 Instance: - Host: devstack-control   Desc: <DHCPd>
MAC_2: fa:16:3e:37:be:fa IP: 2.0.0.2 Instance: 1 Host: devstack-control   Desc: 1_vm1
MAC_3: fa:16:3e:46:db:d5 IP: 2.0.0.3 Instance: 2 Host: devstack-compute-1 Desc: 1_vm2
We can -- of course -- play a bit to verify that 1_vm1 can reach 1_vm2 and the mac/ip addresses are in agreement with what we saw from the openstack commands:
vagrant@devstack-control:~/devstack$ sudo ip netns exec $(sudo ip netns | head -1) bash
root@devstack-control:~/devstack# ip a s
1: lo: <LOOPBACK,UP,LOWER_UP> mtu 65536 qdisc noqueue state UNKNOWN group default
[blablabla]
7: tap085eeb79-ac: <BROADCAST,MULTICAST,UP,LOWER_UP> mtu 1500 qdisc noqueue state UNKNOWN group default
    link/ether fa:16:3e:46:64:2b brd ff:ff:ff:ff:ff:ff
    inet 2.0.0.1/24 brd 2.0.0.255 scope global tap085eeb79-ac
    [blablabla]

root@devstack-control:~/devstack# ssh -o UserKnownHostsFile=/dev/null -o StrictHostKeyChecking=no \
                                      -i /home/vagrant/devstack/id_rsa_demo cirros@2.0.0.2

$ ip a s
1: lo: <LOOPBACK,UP,LOWER_UP> mtu 16436 qdisc noqueue
[blablabla]
2: eth0: <BROADCAST,MULTICAST,UP,LOWER_UP> mtu 1500 qdisc pfifo_fast qlen 1000
    link/ether fa:16:3e:37:be:fa brd ff:ff:ff:ff:ff:ff
    inet 2.0.0.2/24 brd 2.0.0.255 scope global eth0
    inet6 fe80::f816:3eff:fe37:befa/64 scope link
       valid_lft forever preferred_lft forever

$ ping -q -c 3 2.0.0.3
[blablabla]
3 packets transmitted, 3 packets received, 0% packet loss
round-trip min/avg/max = 1.520/9.490/23.461 ms

$ ping -q -c 3 2.0.0.1
[blablabla]
3 packets transmitted, 3 packets received, 0% packet loss
round-trip min/avg/max = 0.514/0.823/1.339 ms

$ cat /proc/net/arp
IP address       HW type     Flags       HW address            Mask     Device
2.0.0.3          0x1         0x2         fa:16:3e:46:db:d5     *        eth0
2.0.0.1          0x1         0x2         fa:16:3e:46:64:2b     *        eth0

$ exit
Connection to 2.0.0.2 closed.
root@devstack-control:~/devstack# exit
exit
vagrant@devstack-control:~/devstack$
Now, to the nuts and bolts of the plumbing: OVS ports/interfaces. In the control node we have the following:
vagrant@devstack-control:~/devstack$ sudo ovs-vsctl show
39745b5b-2ff9-416b-ab3e-f1b81fd29fd7
    Manager "tcp:192.168.50.20:6640"
        is_connected: true
    Bridge br-int
        Controller "tcp:192.168.50.20:6633"
            is_connected: true
        fail_mode: secure
        Port "vxlan-192.168.50.21"
            Interface "vxlan-192.168.50.21"
                type: vxlan
                options: {key=flow, local_ip="192.168.50.20", remote_ip="192.168.50.21"}
        Port br-int
            Interface br-int
                type: internal
        Port "tap085eeb79-ac"
            Interface "tap085eeb79-ac"
                type: internal
        Port "tap3d803796-dc"
            Interface "tap3d803796-dc"
    ovs_version: "2.3.2"

vagrant@devstack-control:~/devstack$ sudo ovs-vsctl list Interface | grep -E '^name|^ofport |^mac_in_use|^external_id'
external_ids        : {}
mac_in_use          : "de:46:75:ea:bd:48"
name                : br-int
ofport              : 65534

external_ids        : {}
mac_in_use          : "1e:ac:ec:85:4b:a1"
name                : "vxlan-192.168.50.21"
ofport              : 2

external_ids        : {attached-mac="fa:16:3e:37:be:fa", iface-id="3d803796-dc00-4f81-872e-dce10947f478", iface-status=active, vm-id="bb16d68b-fffd-4816-a5ee-7b127172f330"}
mac_in_use          : "fe:16:3e:37:be:fa"
name                : "tap3d803796-dc"
ofport              : 3

external_ids        : {attached-mac="fa:16:3e:46:64:2b", iface-id="085eeb79-ac3e-4e61-a0ae-91b30cc48fbd", iface-status=active}
mac_in_use          : []
name                : "tap085eeb79-ac"
ofport              : 1
In the compute-1 node we have the following:
vagrant@devstack-compute-1:~/devstack$ sudo ovs-vsctl show
6a894e1d-05d8-49be-8359-a09978281b36
    Manager "tcp:192.168.50.20:6640"
        is_connected: true
    Bridge br-int
        Controller "tcp:192.168.50.20:6633"
            is_connected: true
        fail_mode: secure
        Port br-int
            Interface br-int
        Port "vxlan-192.168.50.20"
            Interface "vxlan-192.168.50.20"
                type: vxlan
                options: {key=flow, local_ip="192.168.50.21", remote_ip="192.168.50.20"}
        Port "tap4c6f3e8f-02"
            Interface "tap4c6f3e8f-02"
    ovs_version: "2.3.2"

vagrant@devstack-compute-1:~/devstack$ sudo ovs-vsctl list Interface | grep -E '^name|^ofport |^mac_in_use|^external_id'
external_ids        : {attached-mac="fa:16:3e:46:db:d5", iface-id="4c6f3e8f-02f8-4f7e-bc6b-10ff2b95d612", iface-status=active, vm-id="c6bde77a-b196-4e6f-a2eb-23da250fe146"}
mac_in_use          : "fe:16:3e:46:db:d5"
name                : "tap4c6f3e8f-02"
ofport              : 2

external_ids        : {}
mac_in_use          : "32:26:d9:39:a8:46"
name                : br-int
ofport              : 65534

external_ids        : {}
mac_in_use          : "d6:85:ba:5e:16:18"
name                : "vxlan-192.168.50.20"
ofport              : 1
Looking closely at the info obtained above, you can draw a pretty good picture of the mappings between each OVS interface and openstack's tenant vms; as well as how control and compute-1 talk to each other. An important attribute that links the two worlds is the iface-id stored in interface's external_ids. That is actually the id of the Neutron port. This is a brief summary on that:
control  OF port: 1 --> MAC: fa:16:3e:46:64:2b IP: 2.0.0.1 Desc: <DHCPd> ExtrnId: 085eeb79-ac3e-4e61-a0ae-91b30cc48fbd
control  OF port: 2 --> MAC: 1e:ac:ec:85:4b:a1 IP: -       Desc: vxlan-192.168.50.21 (connects control to compute-1)
control  OF port: 3 --> MAC: fa:16:3e:37:be:fa IP: 2.0.0.2 Desc: 1_vm1   ExtrnId: 3d803796-dc00-4f81-872e-dce10947f478

compute1 OF port: 1 --> MAC: d6:85:ba:5e:16:18 IP: -       Desc: vxlan-192.168.50.20 (connects compute-1 to control)
compute1 OF port: 2 --> MAC: fa:16:3e:46:db:d5 IP: 2.0.0.3 Desc: 1_vm2   ExtrnId: 4c6f3e8f-02f8-4f7e-bc6b-10ff2b95d612
Back to Pipeline
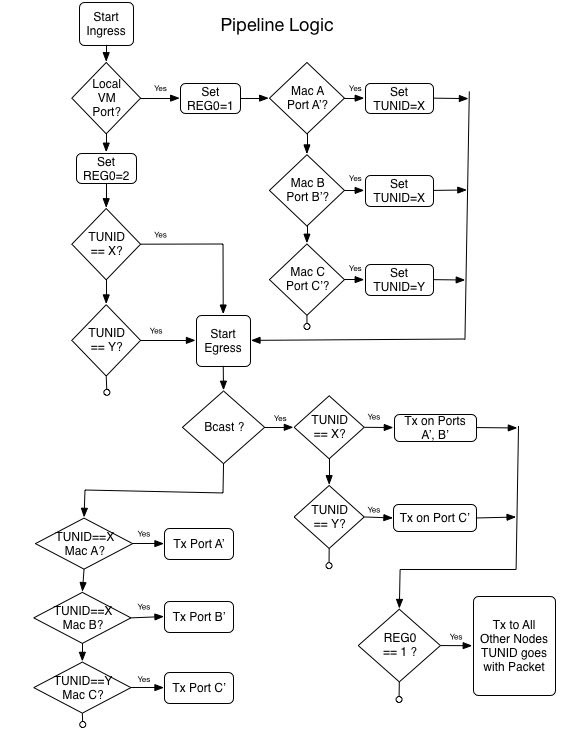
Even after showing you the various Services we support in the pipeline, our example is perhaps too simple to make it flex its muscle. That is so, because all that is needed to do L2 forwarding are tables 0 (CLASSIFIER) and 110 (L2_FORWARDING). Here is a simplification of how the flow goes:

Here is what the openflow rules look like, from the control node:
Here is what the openflow rules look like, from the compute-1 node:
Notes on Table 0 (aka Classifier)
This table is where is all begins. In here, we are looking for 3 potential cases: 1) Packet from local port; 2) Packet from a neighbor node; 3) Packet destined to OF Controller (ie ODL).
1) Packet from local port
Knowing the openflow (OF) port and the source Mac, this rule will set the tun_id to be associated with the packet; and move onto the next table in the pipeline. (Lines 3 and 4 in control; Line 3 in compute-1)
Conversely, if unexpected source Mac arrives in the configured OF port, this table has explicit rules to drop the packet. (Lines 6 and 7 in control; Line 5 in compute-1)
It is possible you may have not noticed this, but tun_id is the exact value as the segmentation_id used in openstack. In our example that value is 1001 (or 0x3e9 in hex). Since there is only one broadcast domain configured so far, this is the only tun_id we see. If another network gets created -- independent of what tenant that is -- we would see a different tun_id used for the new network.
Another key action taken in this path is the setting of REG0. This is a metadata that is attached to the packet. It plays an important role on how to proceed should we determine that packet needs to be flooded. In this particular path, we set REG0 with value 1. (Lines 3 and 4 in control; Line 3 in compute-1)
2) Packet from a neighbor node
When packet arrives on table 0 from another openstack node, it already carries the tun_id it belongs to. Notice that we also know what OF port the packet will be coming in, which is part of the match. Because this packet came from a neighbor, this will explicitly set REG0 with value 2. (Line 8 in control node; Line 6 in compute-1)
3) Packet destined to OF Controller (ie ODL)
This is a simple case of sending packet to controller, based on dl_type (aka ether type 0x88cc, LLDP). By elimination you can see that we will only pay attention to these LLDP packets if they are not part of cases (1) and (2) above. That is the intended behavior. (Line 9 in control node; Line 7 in compute-1)
The code used to populate this table is located here.
Notes on Table 110 (aka L2_Fwd)
By the time the flow logic reaches this table, all that is left to do is to either: 4) Flood packet based on {tun_id, REG0} tuple; 5) Send Unicast Packet to a known {tun_id, mac} tuple.
4) Flood packet based on {tun_id, REG0} tuple
Flooding is triggered based on the Mac destination of the packet. We currently check for the left-most bit only, to also perform the flood on multicast packets. That is why the check is against a mask dl_dst=01:00:00:00:00:00/01:00:00:00:00:00 instead of dl_dst=ff:ff:ff:ff:ff:ff.
There is a further decision to be made when it comes to flooding: do we also send packet to all other neighboring openstack nodes? To determine that, it is essential to know the origin of the packet, back on table 0. And that is the role of REG0 in the pipeline!
When REG0 carries the value of 2, it originated from a neighbor node and that means it should never be flooded out of the receiving node. Only the local port(s) for the given tun_id will receive the flood. (Line 22 in control node; Line 20 in compute-1)
When REG0 carries the value of 1, it originated locally, thus flooding needs to include neighbor nodes. Note that as packet is sent all to tunnel ports, the tun_id is preserved, so the receiving neighbor node will have that info as packet reaches its classifier table. Also, it may be worth mentioning that if there were more than 2 openstack nodes, this rule would contain an action with more output ports listed. (Line 21 in control node; Line 19 in compute-1)
5) Send Unicast Packet to a known {tun_id, mac} tuple
Looking at known tun_id and mac, we can determine what port to use. What this means is that A) all nodes have knowledge of all macs of all broadcast domains, independent of it being local or not; B) because tun_id is taken into account, it is very okay -- yet potentially confusing to operators -- to re-use macs across broadcast domains; C) macs associated to ports used by dhcp servers are also taken into consideration by this logic. (Lines 23 thru 25 in control node; Line 21 thru 23 in compute-1)
The code used to populate this table is located here.
Create More Tenants
If you made it to this point, you are now a master in ovsdb l2 pipelining! I leave it to you to continue the fun. By doing the commands below, you can easily create another tenant and spin up vms for it. Then, using the commands above, have a look on how the new tenant vms affect the openstack tables and openflow 1.3 rules. Remember to pay close attention to tun_id. I urge you to try it out and let me know how it goes!
vagrant@devstack-control:~/devstack$ export TNT_ID=2 ; export VM_COUNT=5 ; \
    /vagrant/puppet/scripts/createTenantAndVms.sh

vagrant@devstack-control:~/devstack$ source openrc user${TNT_ID} tenant${TNT_ID} ; export OS_PASSWORD=user${TNT_ID} ; \
    neutron port-list
Next up -- as mentioned before -- I will show you how we use this pipeline framework to give us L3 functionality. Stay tuned. ;)
Some related links you may find interesting:
Comments
comments powered by Disqus